In the first part of this paper we talked about the most common - and also some of the simplest - ways suspects can try to cover their tracks in an attempt to slow down the investigation. This part of the article is dedicated to some of the more advanced techniques that sometimes can really be challenging to deal with. Let's take a look at some of the possible workarounds when the data we are looking for was deleted or encrypted.
Destroying Evidence by Formatting, Sanitizing or Wiping
Attempting to securely wipe or otherwise destroy evidence stored on hard drives and other media can be the planned last resort. If done properly, secure erase will irreversibly destroy evidence without giving investigators the slightest chance of recovery. However, computer users with average literacy can make mistakes that will result in incomplete destruction. Let’s have a look at what the suspect can do to erase the hard drive.
Formatting the Disk
This is one of the most popular methods of destroying information, and one of the least reliable ones. Sometimes, users will have no understanding of what formatting does, and use Quick Format to clear the content of the device. Obviously, quick-formatted media such as hard drives and USB sticks can be nearly fully recovered by using carving. One notable exception is SSD drives which may (or may not) destroy information automatically in background even after Quick Format. Why and how SSD drives destroy evidence is not the topic of this whitepaper; please refer to "SSD Forensics 2014: Recovering Evidence from SSD Drives: Understanding TRIM, Garbage Collection and Exclusions" for more information.
Even after full formatting, information is not always destroyed. In Windows XP and in earlier versions of Windows, the format command does not write zeros to the whole disk when a full format is performed. Instead, the command will check for bad blocks by reading sectors. This behavior has changed since Windows Vista came out. By default in Windows Vista and newer (Windows 7, 8, 8.1, 10), the format command writes zeros to the whole disk when a full format is performed. (More information at https://support.microsoft.com/en-us/kb/941961).
Data Wipe and Secure Erase Tools
Securely erasing information is a complex topic. Some storage devices come with the ability to self-encrypt data, making secure erase as easy (and as instant) as destroying the decryption key. Even if so equipped, self-encryption must be activated by either the user or the OS, which is not a given. An average computer user may know nothing of such possibility.
A typical secure wipe tool will overwrite the content of a file (or the entire disk volume) with one or more passes of random data. This is enough to permanently overwrite information stored on magnetic hard drives and, to a large extent, on USB flash drives. However, some users will set unnecessarily large number of wipe cycles, overwriting the data several times. Needless to say, this is a much slower wipe that may give law enforcement a chance of stopping the process mid-way.
In order to successfully counter the user’s anti-forensic efforts, an investigator must have clear understanding of what types of data is usually the first to get securely erased. When using automated "cleaners" and "privacy protection" tools, the usual targets are chat histories in popular messengers such as Skype; documents; pictures and video files; Web browsing history. Removing these types of artifacts without proper consideration leaves a lot of traces. Some of these traces may include:
- Fragments. While a file could be securely erased and overwritten, parts of the file (or one of its previous versions, if we’re talking about a document or spreadsheet) might still be available on the disk due to file system fragmentation. If blocks previously used by the file before defragmentation are not yet overwritten with new data, it is possible to carve the file or its parts.
- Multiple copies of some types of files tend to exist. This includes temporary saved copies of working documents, files that were copied, compressed/decompressed or moved around. The user might not have known about those other copies (or forget to securely erase them) and apply secure destruction to just the current copy of the file.
- Recent events such as chats, browser histories, pictures and documents can still be available in hibernation or pagefile. Products like Belkasoft Evidence Center can easily recover such artifacts from these system files.
- Volatile evidence. If a computer or laptop was seized while it was powered on, some recent data can be found in the Live RAM contents (see the section below).
- Volume Shadow Copy. Older versions of the file might be found in Volume Shadow Copy.
- Duplicate data. Some information is duplicated in a number of different files, which the user might be not aware of. For example, deleting just the Skype database will not help clear the history because the chatsync folder may contain the same (or even greater) amount of chats, calls and file transfers compared to the history file. Information in the registry is sometimes duplicated (or complemented) by information in System Event Logs (for example, information on plugged in USB devices). See more in our previous article.
- Traces. Some information, while not exactly duplicated, can be stored in another way, giving implicit evidence about its prior existence. For example, deleting a picture or photo sometimes might not help because a thumbnail is stored in Windows Thumbnail Cache, and it might be possible to create a link between the original photo and its smaller preview image. Opening a document will leave a trace in the system's jumplist file. See more in our previous article.
Secure Erase and SSDs
SSD drives are based on different principles. Overwriting the data does not do any good since there is no guarantee that the SSD drive will overwrite the content of those physical NAND flash blocks that contain data being erased. Why does that happen? SSD drives are based on NAND flash cells to keep information. NAND flash is much slower to erase than to write or read, yet a cell MUST be erased first before it can accept new information. For this reason, the SSD controller will write new data into already erased, empty data cells, remapping the cells to-be-erased and assigning it a different logical address (or placing it into the overprovisioned area). All this means that traditional secure wipe applications will NOT wipe the data the user intends to erase. Depending on the particular SSD type and considering multiple factors (such as the file system being used and whether the SSD drive is an external or internal one), the drive may or may not have “overwritten” data available. This is a rather complex thing that’s out of scope of this whitepaper; however, rest assured that traditional data wipe tools are far less effective on SSD drives than they are on magnetic hard drives. Again, please refer to "SSD Forensics 2014: Recovering Evidence from SSD Drives: Understanding TRIM, Garbage Collection and Exclusions" for more information.
An SSD drive can be wiped quickly with manufacturer-supplied initialization tools that can simply trim the whole content of the drive in a matter of seconds. Even if the actual data is still there, modern SSD drives comply with DRAT (Definite Read After Trim) or DZAT (Definite Zeroes After Trim). This in turn makes SSD controllers return all zeroes or other (fake) data instead of actual information stored in a trimmed block (even if the block itself still contains information). Unfortunately, in this case there is no workaround other than performing a chip-off, which could be an extremely time- and effort-consuming procedure.
Data Encryption
Full-disk encryption is sometimes used by criminals who want to hide their data from investigators. If a reasonably long, complex password is used to encrypt the volume (where applicable, e.g. TrueCrypt), a brute-force attack may not be effective. Even if brute-forcing the password is possible, the process would take a long time, allowing the suspect achieve the goal of delaying the investigation.
When dealing with full-disk encryption, there are two workarounds to consider: the possibility of obtaining the binary decryption key out of the memory dump (which must be captured while the encrypted container is mounted) and the possibility of getting a hold of an escrow key.
TrueCrypt, PGP, BitLocker: Extracting Decryption Key from a Live RAM Dump
Full-disk encryption tools such as TrueCrypt and PGP can be extremely secure and pretty much impossible to break if used properly. Designed to resist brute-force attacks, these tools make attacking encryption keys impossible, while making brute-force attacks extremely slow.
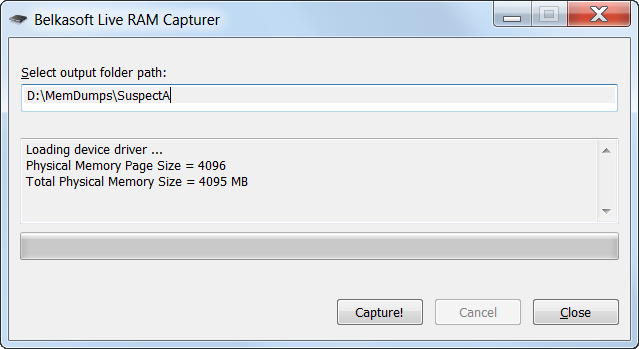
If there is a reasonable chance that the suspect used full-disk encryption, one must capture a memory dump from the live running system before turning it off and taking the disk out. A good free tool for capturing memory dumps is Belkasoft Live RAM Capturer, while both Passware Kit Forensic and Elcomsoft Forensic Disk Decryptor will offer the ability to extract decryption keys out of the RAM dump and use them to decrypt and mount protected volumes.
BitLocker: Escrow Keys May Be Available
Windows 7, 8, 8.1, all versions of Windows RT and Windows 10 are capable of using BitLocker to enable full-disk encryption. Starting with Windows 8, BitLocker encryption is activated automatically on system volume if all of the following conditions are met:
- Device is equipped with a TPM (Trusted Protection Module)
- Device supports Connected Standby
- Non-removable (soldered) RAM
- Administrative user logs in with Microsoft Account (as opposed to using a local Windows account)
Even if some of these conditions are not met, it is usually possible to manually activate BitLocker protection on a given volume.
Once encrypted, the volume remains encrypted unless you were able to capture a Live RAM dump and extract the binary decryption key. However, in addition to this method, an alternative vector of attack is available.
When encrypting the disk with BitLocker, Windows automatically creates escrow keys (BitLocker Recovery Keys) that can be used to decrypt the volume if the disk is removed from the original device (and its TPM module). A proper Recovery Key may look like this:
394853-139583-506726-395820-621405-354512-066290-589293
In order to unlock the encrypted volume, you’ll need a volume Recovery Key. If the administrative user logs in with their Microsoft Account, the Recovery Key will be automatically uploaded to their OneDrive account, and can be retrieved by using the following link: https://onedrive.live.com/recoverykey
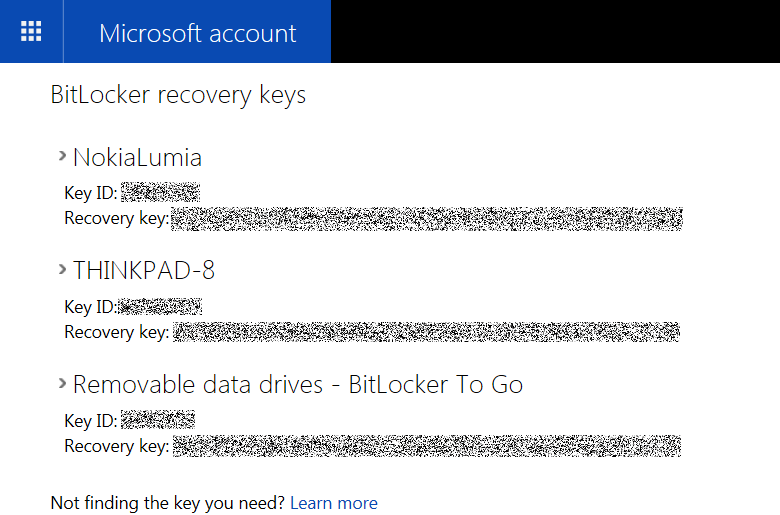
In order to retrieve the Recovery Key, you will need to supply the user’s login and password, if available. Alternatively, Microsoft can disclose the suspect’s Recovery Keys with a court order.
Encrypted File Systems
In Windows, users have an option to transparently encrypt the contents of individual files and folders by setting the “encrypted” attribute.
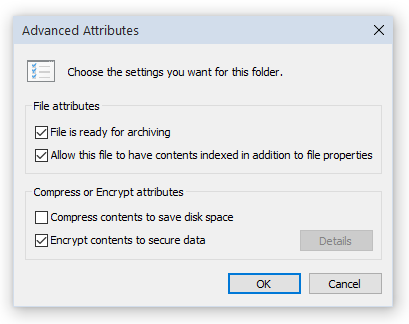
Not to be confused with full-disk encryption provided by BitLocker and similar tools, NTFS file encryption complements BitLocker by adding user-level protection of files and folders. BitLocker encryption protects the entire volume against offline attacks. Once the volume is unlocked by any user of that computer, all users (or at least all users with administrative privileges) will have full access to all files stored on that volume. NTFS encryption is designed to protect sensitive information between multiple user accounts on the same PC. Users who logged in under a certain account will not be able to access NTFS-encrypted files from other accounts without entering the correct password (which is used to calculate the decryption key). If the administrator changes or resets the password to someone’s accounts, all NTFS encrypted files on that account become useless and cannot be decrypted.
NTFS encryption is poorly understood by average computer users. As a result, investigators who can log into a PC with suspect’s credentials will have full unrestricted access to NTFS-encrypted files. However, if suspect’s password is not known, experts will have to brute-force their password in order to be able to access NTFS-encrypted files on that account. Simply resetting the password will render encrypted files useless.
Live System Analysis: Anti-Debugging Protection
Anti-debugging techniques are used extensively by game manufacturers to enforce licensing and prevent cheating. Many well-known products such as AutoCAD and certain forensic tools use anti-debugging code in their license validation code. Sometimes, suspects may use a dedicated anti-debugging tool to protect access to their system’s volatile memory.
An active anti-debugging protection may effectively block non-forensic memory dumping tools (and even some forensic utilities; read “All memory dumping tools are not the same” for more information) from accessing areas of RAM protected by anti-debugging tools.
Examining a live system is always a challenge. You can significantly increase your chances of successfully acquiring the complete and unaltered RAM image by using memory dumping tools that operate in kernel mode. Make sure you know and understand your tools and their limitations. While some manufacturers don’t disclose which API and methodology they use to obtain memory dumps, other manufacturers do. For example, Belkasoft Live RAM Capturer (https://belkasoft.com/ram-capturer) is a free low-level tool supplied with 32-bit and 64-bit kernel-mode drivers. Please note that tools operating in kernel mode can often produce better results than others, while user-mode tools may fail to correctly capture parts of the computer’s RAM due to active anti-debugging protection.
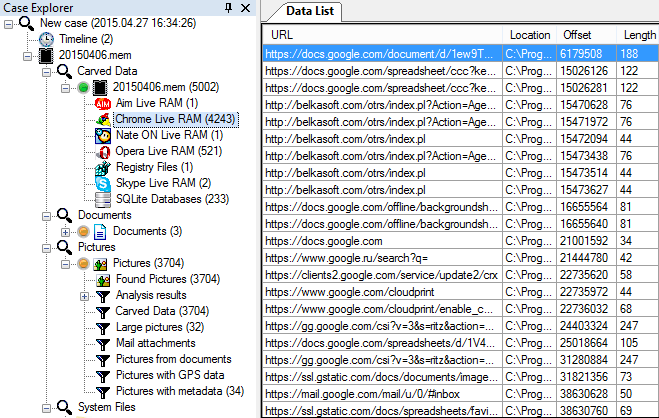
Using a memory acquisition tool requires a forensic product that supports Live RAM analysis in order to be able to extract and examine the contents of volatile memory. Belkasoft Evidence Center allows you to analyze the contents of RAM using powerful carving algorithm, making it possible to find crucial evidence: social network chats, in-private browsing histories, full-size pictures and thumbnails, deleted and damaged registry files, documents, and tons of other data that would otherwise be lost completely.
Please read more about Live RAM forensics in the following whitepaper: "Catching the ghost: how to discover ephemeral evidence with Live RAM analysis".
Conclusion
Many types of anti-forensic efforts can be countered with advanced forensic methods. While in certain cases such as with jumplists, thumbnails and Skype chatsync databases the use of dedicated forensic tools is not necessarily required, manually searching the disk for all available traces can be a time-consuming operation requiring a qualified expert to spend hours on low-level analysis. The overwhelming diversity of applications, file formats, Web browsers and crypto containers, image and document formats means there can be a huge number of places containing hidden evidence. Even the most qualified investigator may not be able to discover every little bit of information there is. Time constraints may not allow performing a thorough analysis of all but the most important cases.
Specialized forensic tools will look for all available artifacts and find all available traces automatically, greatly simplifying digital investigations and making them faster and easier. Forensic tools will help you find more evidence faster, saving a lot of time and effort.
The use of forensic tools often requires no special training or qualification, enabling in-house discovery of digital evidence. Finally and most importantly, the use of forensic tools allows you to find destroyed and hidden evidence, something that is not possible to do by hand.
Stay tuned
Belkasoft will continue its series of articles on antiforensics.
About the authors
Oleg Afonin is Belkasoft sales and marketing manager. He is
an author, expert, and consultant in computer forensics.
Danil Nikolaev is Belkasoft sales and marketing manager, co-author, and
content manager.
Yuri Gubanov is a renowned digital forensics expert. He is a frequent speaker
at industry-known conferences such as CEIC, HTCIA, TechnoSecurity, FT-Day, DE-Day
and others. Yuri is the Founder and CEO of Belkasoft, the manufacturer of digital
forensic software empowering police departments in about 70 countries. With years
of experience in digital forensics and security domain, Yuri led forensic training
courses for multiple law enforcement departments in several countries. You can add
Yuri Gubanov to your LinkedIn network at
http://linkedin.com/in/yurigubanov.
Contacting the authors
You can contact the authors via email:
research@belkasoft.com
Follow Belkasoft on Twitter:
https://twitter.com/Belkasoft
Subscribe to the blog:
https://belkasoft.wordpress.com
Previous Part: Countering Anti-Forensic Efforts - Part 1