Automating Digital Forensic Workflows with Belkasoft X
In a recent webinar, JB Brooks, Director of a high-capacity cybercrime lab and a long-time Belkasoft X user, shared how his team reduced their manual workload by around 30 percent using smart automation. His session offered a grounded, no-nonsense look into how structured naming, scripting, and high-performance computing can help digital forensics teams save hours—if not days—on repetitive tasks.
Brooks champions a refreshingly pragmatic approach: start small, identify repeatable steps, and scale automation only when necessary. Whether you are just beginning to explore scripting or already managing a sophisticated forensic automation pipeline, this perspective offers valuable takeaways.
Building on these practical insights, this article demonstrates the powerful automation capabilities within Belkasoft X. We will guide you through:
- Automating Belkasoft X processing via the command-line interface (CLI)
- Generating JSON configuration files using Belkasoft's intuitive Command Line Configurator
- Leveraging Python scripting for efficient batch processing of multiple cases
- Exploring GUI automation with PyAutoGUI as a viable fallback solution
- Sharing practical advice and best practices gleaned from real-world forensic scenarios
Read on to learn how automation can streamline your digital forensic processes, reduce manual workload, and save valuable time.
Building your forensic automation workflow
Before writing a single line of Python or scripting, Brooks recommends starting with a pen and a notebook. This way, you can draw how data moves through the lab—from acquisition, through processing, to final reporting, and reveal repeatable tasks that are ideal for automation.
At Brooks' lab, case and evidence names follow a strict format: the year and a sequential number. Files are organized into consistent folders—raw data goes into one location, and processed results are stored in another. This rigid logic is what makes automation possible. If you cannot predict file locations, your script will not be able to find them either.
Automating Belkasoft X with CLI
Belkasoft X offers straightforward automation through its command-line interface (CLI). The built-in Command Line Configurator, located in the App subdirectory of the product installation folder, provides a visual method to create JSON configuration files quickly. This tool is especially helpful if you are new to scripting. Here is a basic workflow:
- Specify your data source (disk, folder, or image).
- Choose an analysis profile that matches the requirements of your specific case or data source.
- Specify your preferred report formats.
- Save your selections as a JSON configuration file.
Once your JSON configuration is prepared, you can automate your workflow by launching Belkasoft X directly from the command line:
Belkasoft.Cli.bat -optionsPath="path\to\your_config.json"
Note: To execute this command successfully, you need to run it with administrative privileges.
This single command initiates acquisition, analysis, and reporting based on your predefined settings, running without manual intervention.
Command line configurator explained
The Command Line Configurator creates structured JSON configuration files that Belkasoft X uses to automate forensic workflows. It consists of four sections:
- Case options: General settings like case name and directories.
- Acquisition options: Defines how data is acquired (for example, from a disk or Tableau device).
- Analysis options: Specifies data sources, paths, and analysis profiles.
- Report options: Determines the desired output formats and report location.
- BelkaGPT options: Enables data preprocessing for BelkaGPT and allows asking it a list of predefined questions.
Note: You can skip certain sections depending on your specific requirements. For example, if you have all the images at hand, you can skip the acquisition stage. Similarly, you can skip analysis and reporting.

Command line configurator in Belkasoft X
Let us examine each section and its corresponding JSON structure.
Case options
This section contains general settings such as the application path, case name, and case directory. You can specify a new case name or reference an existing one if you are adding a new data source.
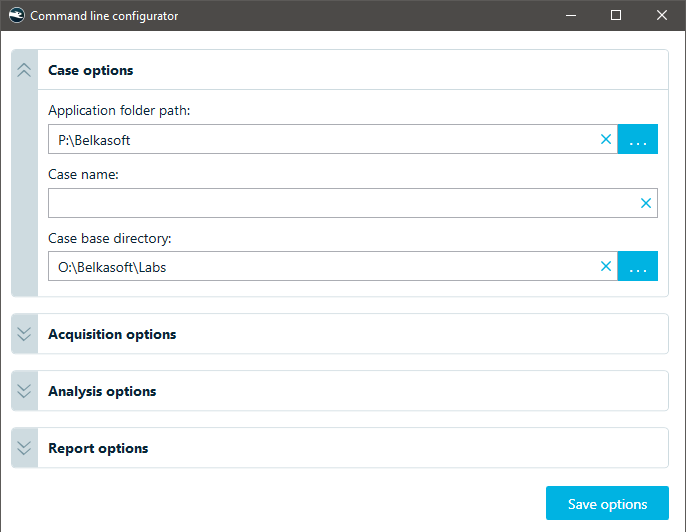
Case options in the command line configurator
In the JSON file, these settings form the top-level structure:
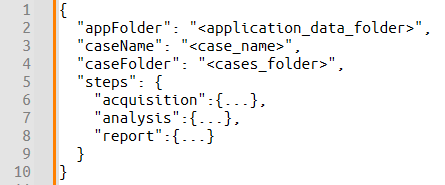
Case options in the resulting JSON
| Field Name | Description | Example |
|---|---|---|
| appFolder | The full path to the folder where Belkasoft X will store logs, configuration options, and temporary files. | "C:\\ProgramData\\Belkasoft Research\\Belkasoft X" |
| caseName | The name of the case. If a case with this name does not exist, Belkasoft X will create a new one. | "Case_01" |
| caseFolder | The full path to the folder where all case-related data will be stored. | "D:\\Belkasoft\\Cases\\Case_01" |
| steps | An object defining the operations to be performed. Supported steps include: acquisition, analysis, and report. | { "acquisition": { ... }, "analysis": { ... }, "report": { ... }, "gptOptions": { ... } } |
Acquisition options
Here, you specify how to acquire data, such as imaging a logical or physical drive or retrieving data from a network-connected Tableau device.
Logical or physical drive
Here are the options you define when acquiring a local drive:
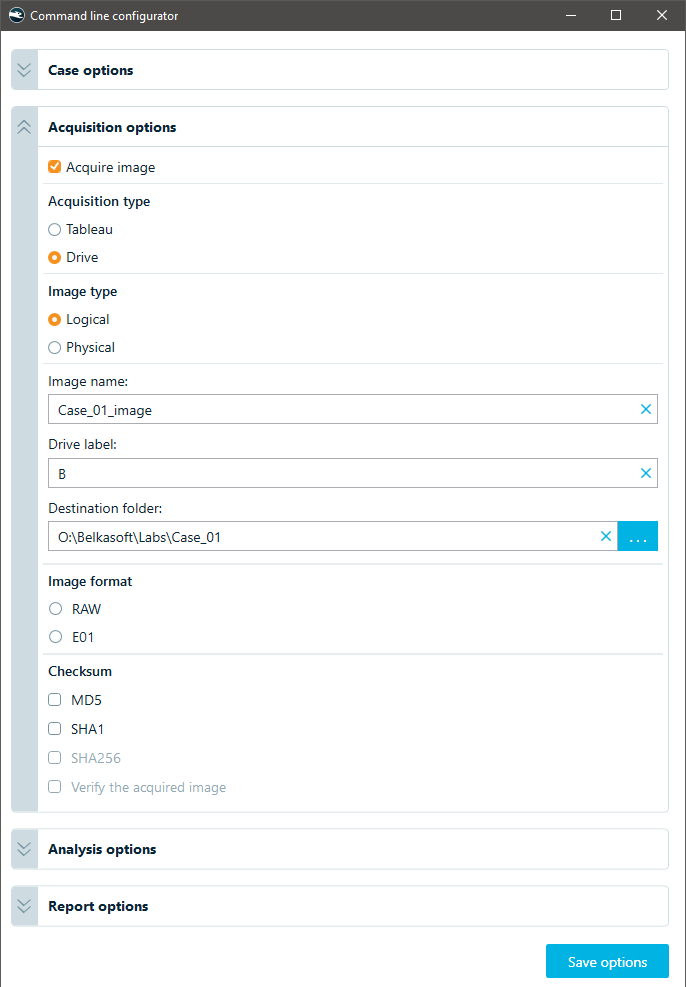
Logical drive acquisition settings
The resulting acquisition section of your JSON file will look like this:

Logical drive acquisition settings in JSON
| Field Name | Description | Example |
|---|---|---|
| acquisitionType | Specifies the type of acquisition. Must be set to "disk" for local disks or drives. | "disk" |
| diskOptions | ||
| imageType | Specifies the type of image to be acquired: "logical" or "physical". | "logical" |
| imageFormat | Specifies the format of the acquired image: "E01" or "RAW". | "E01" or "RAW" |
| verifyOutput | A boolean value. If set to true, Belkasoft X will perform a verification of the acquired image after the acquisition. | true or false |
| hashAlgorithm | A string specifying one or more hash algorithms to be used. Multiple algorithms should be comma-separated. Supported algorithms are: "md5", "sha1", and "sha256". | "sha1" or "sha1, sha256, md5" |
| imageName | The desired name for the output image file (without the file extension). | "Drive_B_Image" |
| sourceDrive | The drive letter (e.g., "B") for a logical drive or the physical drive identifier (for example, "\\\\.\\PhysicalDrive0") for a physical drive. | "B" or "\\\\.\\PhysicalDrive0" |
| destinationFolder | The full path to the folder where the acquired image will be saved. | "O:\\Belkasoft\\Acquired_Drives" |
Tableau acquisition
Alternatively, you can acquire data via a network-connected Tableau device:
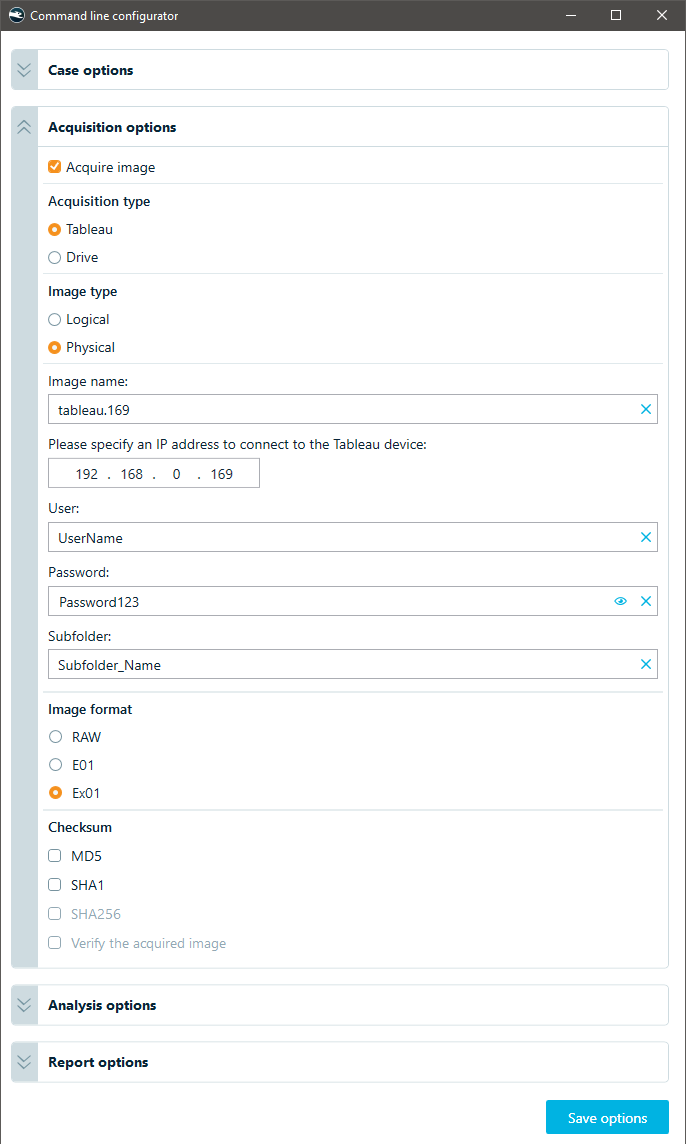
Tableau drive acquisition settings
Subsequently, the acquisition section in JSON will look as below:
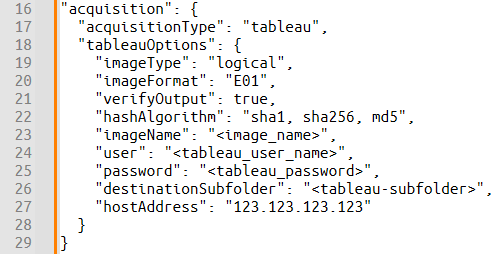
Tableau drive acquisition settings in JSON
| Field Name | Description | Example |
|---|---|---|
| acquisitionType | Specifies the type of acquisition. Must be set to "tableau" for Tableau devices. | "tableau" |
| tableauOptions | ||
| imageType | Specifies the type of image to be acquired: "logical" or "physical". | "logical" |
| imageFormat | Specifies the format of the acquired image. For physical acquisition: "E01", "RAW", or "Ex01". For logical acquisition: "Lx01". | "Lx01" |
| verifyOutput | A boolean value. If set to true, Belkasoft X will perform a verification of the acquired image after the acquisition process is complete. | true or false |
| hashAlgorithm | A comma-separated string specifying one or more hash algorithms to be used during acquisition. Supported algorithms are: "md5", "sha1", and "sha256". | "sha1, sha256" |
| imageName | The desired name for the output image file (without the file extension). | "Evidence_Image" |
| user | The username for authenticating to the Tableau device. This is required for network-based acquisition. | "forensic_user" |
| password | The password for authenticating to the Tableau device. This is required for network-based acquisition. | "SecurePassword123" |
| destinationSubfolder | The name of the subfolder within the caseFolder where the acquired image will be stored. | "Acquired_Images" |
| hostAddress | The IP address or hostname of the remote Tableau write blocker device on the network. This is required for network-based acquisition. | "192.168.1.100" |
Analysis options
Configure your analysis tasks in this section, specifying data sources, paths, and the analysis profile to use.
Before you begin, verify that the required analysis profiles are present in Belkasoft X's settings, or create additional profiles if necessary. Consider the specific requirements of each data source, as some may enable extra options, such as:
- Volatility analysis for memory
- Virus signature analysis using integration with services like VirusTotal or ClamAV
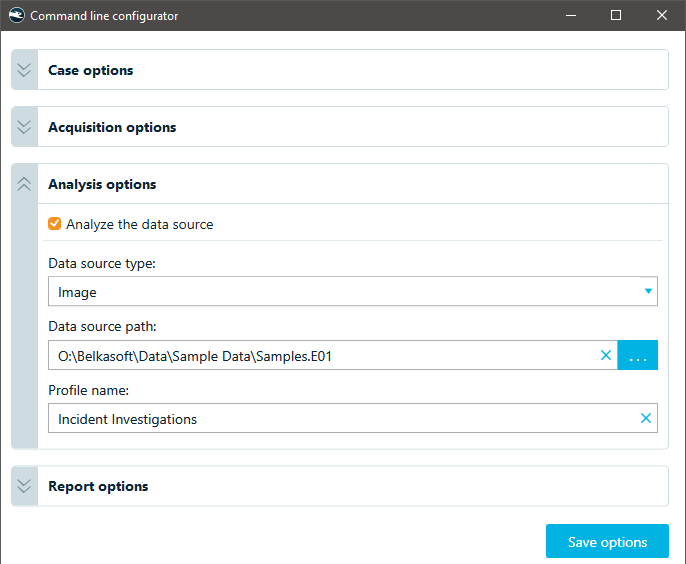
Analysis settings in the command line configurator
The corresponding JSON for analysis settings is as follows:
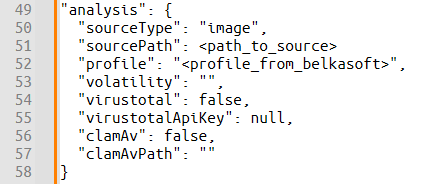
Analysis settings in JSON
| Field Name | Description | Example |
|---|---|---|
| sourceType | Specifies the type of data source to be analyzed. Supported values include: "image", "folder", "ram", "mobile", "logicalDrive", or "physicalDrive". | "image" |
| profile | The name of the processing profile to be used for analysis, as defined in Belkasoft X. | "Full Analysis" |
| volatility | (applicable for "ram" sourceType) The full path to a Volatility framework profile file. Leave empty if no Volatility analysis is required. | "C:\\Volatility\\volatility_profile.zip" or "" |
| virustotal | (applicable for "ram" sourceType) A boolean value. If set to true, Belkasoft X will integrate with VirusTotal to scan files for malware. | true or false |
| virustotalApiKey | (applicable for "ram" sourceType) Your API key for accessing the VirusTotal service. This is required if virustotal is set to true. | "your_virustotal_api_key" or null |
| clamAv | (applicable for "ram" sourceType) A boolean value. If set to true, Belkasoft X will use ClamAV for anti-virus scanning. | true or false |
| clamAvPath | (applicable for the "ram" sourceType) The full path to the ClamAV executable file (clamscan). This is required if clamAv is set to true. | "C:\\Program Files\\ClamAV\\clamscan.exe" |
Report options
Here, you define your output report formats and report storage location.
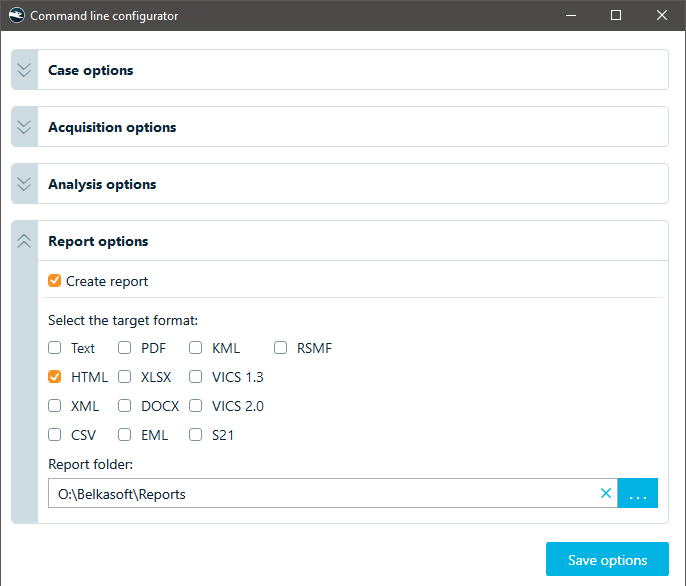
Report options in the command line configurator
The corresponding JSON section is straightforward:

Report options in JSON
| Field Name | Description | Example |
|---|---|---|
| format | A comma-separated string listing the desired report formats to be generated. Supported formats include: "csv", "pdf", "docx", "xlsx", "xml", "eml", "html", "kml", "rsmf", "s21", "text", "vics13", and "vics20". | "csv, pdf, html" |
| folder | The full path to the folder where the generated reports will be saved. | "O:\\Belkasoft\\Case_01\\Reports" |
Note: If reporting is enabled, the system will start opening generated reports "as they go".
BelkaGPT options
This section lets you add BelkaGPT preprocessing to your data analysis workflow. This automation is especially helpful for large data sources that require high GPU throughput. You can also write or upload a prepared list of questions for BelkaGPT to run, so your investigation starts automatically.
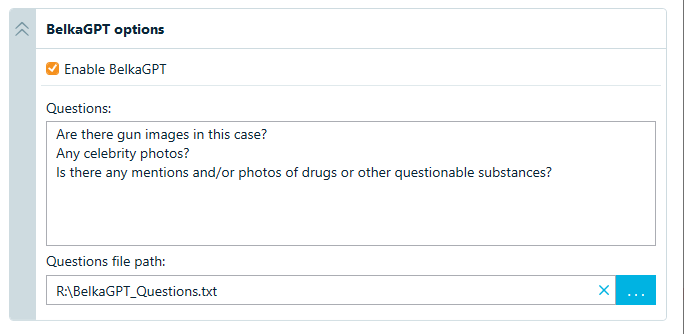
BelkaGPT options in the command line configurator

BelkaGPT options in JSON
| Field Name | Description | Example |
|---|---|---|
| gptEnabled | A boolean value. If set to true, Belkasoft X will process data with BelkaGPT. | true or false |
| questionsFilePath | The full path to the pre-made text file with questions to process. | "R:\\BelkaGPT_Questions.txt" |
| questionsBox | A list of questions to ask BelkaGPT after processing a case. Should be separated by \r\n (Windows newline character). Can be left empty if questions are loaded from a file. | "Question#1\r\nQuestion#2\r\nQuestion#3" |
Note: To automate picture description, picture classification, and speech recognition tasks for a data source, first create an analysis profile with these options enabled, then select this profile in the Analysis options section of the Command Line Configurator.
Final JSON example
The following JSON configuration combines all four sections discussed above to acquire logical drive E:, analyze it, and generate all available report formats:
{
  "caseName": "Acquire_Drive_Case",
  "caseFolder": "D:\\Belkasoft\\Cases_Directory",
  "appFolder": "P:\\Automation_Data",
  "steps": {
    "acquisition": {
      "acquisitionType": "disk",
      "diskOptions": {
        "imageType": "logical",
        "imageFormat": "E01",
        "verifyOutput": true,
        "hashAlgorithm": "sha1, sha256, md5",
        "imageName": "Drive_E_image",
        "sourceDrive": "E",
        "destinationFolder": "D:\\images_folder"
      }
    },
    "analysis": {
      "sourceType": "image",
      "profile": "Profile_For_Drives",
      "volatility": "",
      "virustotal": false,
      "virustotalApiKey": null,
      "clamAv": false,
      "clamAvPath": ""
    },
    "report": {
      "format": "csv, xml, docx, eml, html, kml, pdf, rsmf, s21, text, vics13, vics20, xlsx",
      "folder": "D:\\Belkasoft\\Reports"
    },
    "gptOptions": {
      "gptEnabled": true,
      "questionsFilePath": "R:\\BelkaGPT_Questions.txt",
      "questionsBox": "Are there gun images in this case?\r\nAny celebrity photos?\r\nIs there any mention and/or photos of drugs or other questionable substances?"
    }
  }
}
Note: If you need a full JSON configuration file specifications, please contact Belkasoft support.
In the webinar, Brooks calls the Command Line Configurator the "baby's first" automation tool—and he means that in the best possible way. The tool is graphical, forgiving, and generates functional JSON without requiring manual scripting. For processing a single disk image with standard analysis and PDF/CSV reports, the Configurator makes it simple: point, click, save the JSON, and run the CLI command. Then, go grab that coffee.
However, this convenience diminishes when dealing with multiple evidence sources simultaneously. Manually creating and running configurations for each item quickly becomes inefficient.
Scaling up: Processing multiple sources with Python scripting
Manually importing and processing each source individually can quickly become tedious and error-prone. Imagine needing to process several distinct data sources for a single investigation:
- A full logical disk image from drive "B:"
- A folder containing exported EVT logs
- A mobile device image in E01 format from another case
This is where scripting shines. Instead of repetitive manual configuration, you can generate multiple JSON configuration files (one for each source):

Then, a Python script can automate the processing of an entire queue of these configurations, potentially running overnight. This script can also log the outcome of each process, so no babysitting is required.
Here is an example Python script to manage such batch processing:
import os
import subprocess
from datetime import datetime

# --- Configuration Variables ---
# Define paths for the Belkasoft CLI, configuration files, and debug logs.
BELKASOFT_CLI = r"P:\Belkasoft\Belkasoft.Cli.bat"
CONFIG_FOLDER = r"C:\BelkasoftAuto\configs"
DEBUG_LOG_FOLDER = r"C:\BelkasoftAuto\debug_logs"

# --- Log File Setup ---
# Prepare the main automation log file with a timestamp.
timestamp = datetime.now().strftime("%Y%m%d-%H%M%S")
# Define the name of the main automation log file.
LOG_FILE = f"automation_log_{timestamp}.txt"

# Verify a debug log folder exists
os.makedirs(DEBUG_LOG_FOLDER, exist_ok=True)

# --- Logging Function —
# Helper function to write results to the main automation log file.
def log_result(config_file, status, message):
    log_timestamp = datetime.now().strftime("%Y-%m-%d %H:%M:%S")
    case_name = os.path.splitext(os.path.basename(config_file))[0]
    with open(LOG_FILE, "a") as log:
        log.write(f"{log_timestamp} | {case_name} | {status} | {message}\n")

# --- Main Automation Logic —
# Iterate through config files, execute Belkasoft CLI, and log outcomes.
def main():
    for file in os.listdir(CONFIG_FOLDER):
        if file.endswith(".json"):
            config_path = os.path.join(CONFIG_FOLDER, file)
            case_name = os.path.splitext(file)[0]
            debug_log_path = os.path.join(DEBUG_LOG_FOLDER, f"{timestamp}_{case_name}_debug.log")

            try:
                print(f"Processing {file}...")

                with open(debug_log_path, "w") as debug_log:
                    # Execute the Belkasoft.Cli tool as a subprocess.
                    # stdout and stderr are captured to be written to the debug log and console.

                    process = subprocess.Popen(
                        [BELKASOFT_CLI, f'-optionsPath={config_path}'],
                        stdout=subprocess.PIPE,
                        stderr=subprocess.STDOUT,
                        text=True,
                        shell=False
                    )

                    for line in process.stdout:
                        print(line, end="")  # Output to screen
                        debug_log.write(line)  # Write to debug log

                    process.wait()

                if process.returncode == 0:
                    log_result(file, "SUCCESS", "Processed successfully")
                else:
                    log_result(file, "FAILURE", f"Exited with code {process.returncode} (see {debug_log_path})")

            except Exception as e:
                log_result(file, "ERROR", f"{str(e)} (see {debug_log_path})")

# --- Script Entry Point ---
# This ensures the main function runs when the script is executed.
if __name__ == "__main__":
    main()
This script systematically works through each .json file in your specified folder, executes the Belkasoft CLI for each, and logs whether the process succeeded or failed, along with pointers to detailed output logs for troubleshooting. By morning, your forensic sources can be neatly acquired, analyzed, and ready for review:
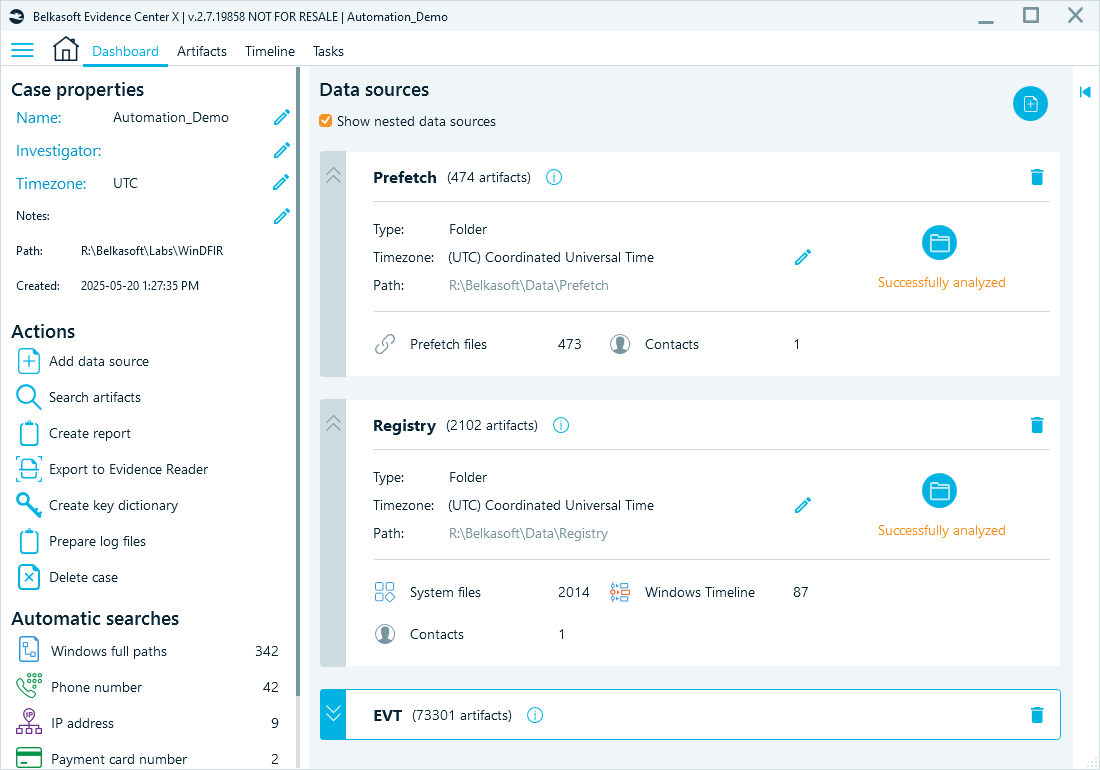
Processing result in Belkasoft X
Advanced users can take this further by dynamically generating the JSON configuration files via scripting, fully automating the setup process based on input parameters or case management system data. This, however, requires a well-defined forensic workflow that we discussed in the beginning.
Other alternatives: GUI scripting with PyAutoGUI
When tools do not support command-line interfaces or APIs, Brooks automates them using PyAutoGUI, a Python library that can automate mouse clicks and keyboard inputs. While less robust than native CLI or API scripting, GUI automation can be an effective workaround, especially for automating repetitive GUI interactions in legacy or GUI-only applications, perhaps as part of an overnight batch process.
With PyAutoGUI, you can:
- Locate GUI elements on the screen (using image recognition).
- Simulate mouse movements, clicks, and drags.
- Simulate keyboard inputs (typing text, pressing keys).
- Iterate through lists of evidence items or files.
- Pass file paths or other data into GUI application fields.
- Automate tasks like data export to predictable locations.
While PyAutoGUI offers a way to automate otherwise inaccessible interfaces, it is crucial to understand its limitations:
- Fragility: GUI automation scripts are sensitive to changes in the application's interface (button positions, colors, icons). Updates to the target software can easily break the script. Relying on image recognition requires stable, unique visual cues.
- Dependency on screen state: Scripts assume the application is in a specific state and visible on the screen. Unexpected pop-ups or changes in window focus can cause failures.
- Speed: GUI scripting is generally much slower than CLI or API automation due to the need to wait for interface elements to appear and respond. Pauses (pyautogui.sleep()) are often necessary.
- Screen resolution and portability: Scripts often rely on screen coordinates or image matching, making them sensitive to screen resolution changes and difficult to port between machines with different display settings.
While experts strongly favor CLI and API-based automation for their reliability and efficiency, GUI scripting remains a useful tool in the forensic expert's arsenal for specific situations where no other option exists.
Best practices for forensic automation
In conclusion, based on practical experience, here are several key lessons for building a robust automation pipeline:
- Start small: Automate repetitive tasks first, such as data parsing or standard exports.
- Stay modular: Avoid creating complex single-point-of-failure scripts. Split tasks into smaller, manageable steps.
- Plan for errors: Incorporate logging and error handling into scripts. If an error occurs, ensure your script reports it rather than silently failing.
- Keep learning: Start with easy-to-use graphical tools like Belkasoft's configurator, then gradually progress toward CLI- and API-based scripts for greater flexibility.
- Test in a safe environment: Always test new scripts or configurations, particularly complex ones involving high-performance computing, in isolated environments (like virtual machines) before deploying them across your lab.
By embracing automation, digital forensics professionals can significantly enhance their efficiency and effectiveness, allowing them to focus on the most critical aspects of their investigations.
Conclusion
In this highly recommended webinar, JB Brooks encourages forensic investigators to start experimenting with coding, even if they do not yet feel confident in their abilities:
"You are going to have errors. You're going to get frustrated. That's the whole point. You are learning. You're developing mental muscle memory in order to actually do code."
The automation journey is only one step in your iterative learning and refinement. The potential rewards—saved time, reduced errors, and increased capacity—are well worth the effort.
Ready to take the next step? Explore the automation features within Belkasoft X and start reclaiming your valuable time.