Automation of your DFIR workflows with Belkasoft has been a well-received topic recently. Following our previous article that explains export of data from Belkasoft X to Amped FIVE, and our customer requests, we continue the series with the new article on how to automate image processing with Belkasoft X and Griffeye tools.
Why Griffeye?
DI Pro is the product of a Swedish company called Griffeye, renowned for developing advanced solutions for handling large amounts of images and videos.
While Belkasoft X has a wide range of media forensics features, the Griffeye product is much more focused on them. In particular, Griffeye DI Pro is recognized for its advanced capabilities in media file forensics, including but not limited to in-depth analysis features that provide valuable insights and enhance the examination process.
Besides, multiple Belkasoft customers especially working in ICAC organizations, requested this kind of integration.
For these reasons, Belkasoft has linked arms with Griffeye to allow our customers who need in-depth media forensics analysis capabilities and wish to automate media processing with both Belkasoft X and Griffeye DI Pro—without even showing any of the products' user interface.
How-To
Before creating your Belkasoft-Griffeye workflow, refer to our previous article to learn how you can acquire and analyze an image with Belkasoft X.
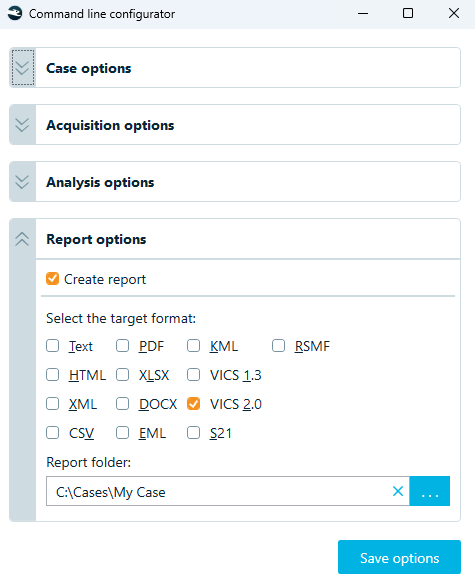
In order to link the two tools, you will need to export Belkasoft X findings to a format, which Griffeye DI Pro supports as an input. ProjectVic format comes handy as both tools can work with it. Now, use Belkasoft Automation Configurator tool to select ProjectVic as a format of choice for your report:
As a result, all media files from your case will be exported to a selected folder, and their descriptions will be stored in a JSON file, which you will find under the target report folder:

The JSON file describes all the media files exported, while the actual files are stored under the Files subfolder. Every record in the JSON will have a reference to the actual exported file in the RelativeFilePath property, e.g. "RelativeFilePath": "Files\\1559116913332483.jpg".
Now, you are ready to continue your analysis in DI Pro. The easiest way would be to run the following command line:
analyze-cli.exe import --case-folder "C:\my_cases" --name case123 --source-id source1 --source-path "C:\Cases\Digital Forensic Case\Digital Forensic Case.json" --source-type vics --include-vics-data all
Let us go through these options:
- analyze-cli.exe is the Griffeye's command line tool, which you want to run to combine any other tool with DI Pro
- --case-folder and --name options speak for themselves; this is where you would like to store your Griffeye case and how you would like to name it
- --source-path is a path to your Belkasoft X report in VICS format
It does not matter, whether you export picture or video files or a mixed content. DI Pro will accept any of these.
Conclusion
Automation and, particularly, unattended execution provide a DFIR examiner with multiple benefits, including the integration of tools from different vendors. In this article we described a brief walkthrough of how to couple Belkasoft X and Griffeye DI Pro, a prominent media forensics software.
Starting with the X Forensic edition, Belkasoft X comes standard with the built-in automation, which does not imply any extra cost. You can easily configure multi-step workflows with a simple configurator tool included within the product package, which includes media files export and import options to other tools. You can create your own batch files or scripts to achieve more complex workflows, involving multiple DFIR products.