Shafik Punja's review of Belkasoft X
Shafik G. Punja is a former law enforcement officer, with 25 years in policing, of which over 16 years was spent as a digital forensic examiner for a law enforcement agency, assigned to the Digital Forensics Team (Cyber/Forensics Unit).

"In my opinion, based on my general review, I would consider Belkasoft X for parsing Windows data, iOS and Android mobile data."
Introduction
In October of 2020, I was approached by my respected professional colleague, Yuri Gubanov (Owner and CEO of Belkasoft), to review their latest product, Belkasoft X (or Belka X).
I will begin first, by stating that anything noted herein about Belkasoft X, is a reflection of my own thought processes and has NOT been influenced by the Belkasoft. Secondly, I use a wide variety of tools for analyzing data. I find leveraging a multi-tool approach an asset, in that it allows me to view the same data from different perspectives. No software is perfect, our collective, constructive use and feedback to the vendors helps to greatly improve any product.
My first interest in the Belkasoft products was specifically for parsing Instant Messenger (IM) chat communications. I have been watching the Belkasoft products evolve for well over 8 years, with more features being added to assist examiners.
This review of Belkasoft X was built running Belkasoft X x64 version 1.0.6190 on Windows 10 20H2 (OS Build 19042.30) running in VMFusion 12.1.0. The ‘README.txt’ file, that is contained in the download archive of Belkasoft X, specifically indicates “Mac users can run the tool under bootcamp.” Test data that comes with installing Belkasoft X, and publicly accessible CTF data was used for processing and analysis within Belkasoft X. Links to the CTF data are provided in the Sources section of this article.
The intent of this review is to provide an overview of the Belkasoft X. I will not be describing every detail of Belkasoft X, nor trying to explain every single aspect of how to use Belkasoft X. This is not meant to act as or replace the provided user guide and tutorial videos. Rather, the intent of this article is to act as a general review, using several different types of datasets. I strongly urge you to obtain a trial version and explore the product using the test and CTF data. In addition to Belkasoft X, Belkasoft also provides a free RAM capturing product called Belkasoft Live RAM Capturer that is available from their website.
Belkasoft X What’s New: This is an extensive overview that explains the differences between Belkasoft X and its predecessor, Belkasoft Evidence Center 2020, which includes: new user Interface and new windows, usability, workflow, triage, acquisition, iOS forensics, bookmarking, viewers, medial file forensics, and new and updated artifact parsing support.
Belkasoft X Editions: The reader should also be aware that there are four different editions (or versions) of the Belkasoft X product: X Computer, X Mobile, X Forensic, and X Corporate. If you are doing Incident Response (IR), then you want to use X Corporate, that in addition to the X Forensic, also has an IR module to investigate hacking and intrusions into Windows-based computers.
Belkasoft X: What Can It Do? (and Cannot Do)
What Belkasoft X can do relative to its technical specifications are listed below, cited directly from Belkasoft’s website: https://belkasoft.com/x#technical-specifications.
COMPUTER
- Operating systems: Windows, macOS, Unix-based systems (Linux, FreeBSD, etc.)
- Storage devices: hard drives and removable media
- Disk images: EnCase, FTK, X-Ways, AFF4, L01/Lx01, DD, SMART, Atola, DMG, archive files (such as tar, zip and others)
- Virtual machines: VMWare, Virtual PC/Hyper-V, VirtualBox, XenServer
- Memory: RAM dumps, hibernation files, page files
- File systems: APFS, FAT, exFAT, NTFS, HFS, HFS+, ext2, ext3, ext4
- Acquisition: Available to DD or E01 images with optional hash calculation and verification
MOBILE
- Operating systems: iOS (iPhone/iPad), Android, Windows Phone 8/8.1, Blackberry
- Data sources: Mobile backups, UFED and OFB images, GrayKey, chip-off dumps, TWRP images, JTAG dumps, Blackberry IPD and BBB backups, Android physical dumps, Xiaomi MIUI backups, Huawei HiSuite backups
- File systems: APFS, HFS+, F2FS, YAFFS, YAFFS2, ext2, ext3, ext4
- Acquisition
- iOS: iTunes, agent-based , checkm8-based , lockdown file support, PTP/MTP, jailbroken devices support
- Android: ADB backup, agent-based, rooted devices support, PTP/MTP, MediaTek
CLOUD
- iCloud
- Email: Yahoo, Hotmail, Opera, Yandex, Mac.com and 25 more webmail clouds
In my conversations with Yuri, about Belkasoft X capabilities, I also gathered additional information which is worth noting.
- One of the best iPhone acquisition feature set (comparable to Cellebrite) – includes checkm8, agent acquisition (jailbreak-free), jailbreaks, lockdown files, lifting USB restrictions etc.
- Memory Analysis: Support for process extraction for Windows, Linux and ARM, not for Mac. Can extract process list, review each process memory, under HexViewer, carve for artifacts, and detect malware.
- Volume Shadow Copy (VSC) data can be viewed as a snapshot in the same tree at the same level as the current state of the drive.
- Triage profiles: This will show all “profiles” – that is, databases/storage files used by various apps – without extracting data.
- Using Belkasoft X triage feature, you can decided to only extract those data areas of interest such as files, belonging to Outlook, Skype, Chrome. This can be very useful for example, with Outlook email PST files that are large in size.
- You will also find all “nested” data sources such as mobile backups and virtual machines – again, without analyzing them.
Specifically, there are certain limitations to the product.
- Cannot mount Windows RAM as a virtual file system like MemProcFS. No digital forensics product does this yet, that I am aware of.
- Limited cloud-based acquisition capabilities.
- No special support for T2 Mac devices – yet.
- No PCAP/PCAPNG (captured network traffic) data analysis capabilities.
Belkasoft X Start
Like many other mainstream, commercial digital forensics acquisition and analysis products that you may have been exposed to, Belkasoft X is a software GUI (graphical user interface) based tool. When installing Belkasoft X, there are two options that are unchecked during the install process: ‘Install sample data image’, and ‘Check updates every time the product starts’. If you don’t have any sample data for Belkasoft X to parse then this check this option, and similarly also check for updates if you want to be using the latest version.
The sample data is located in the program folder application path under: ‘C:\Program Files\Belkasoft Evidence Center X\Sample Data’ folder in the form of an EnCase evidence file format with filename ‘Samples.E01’.

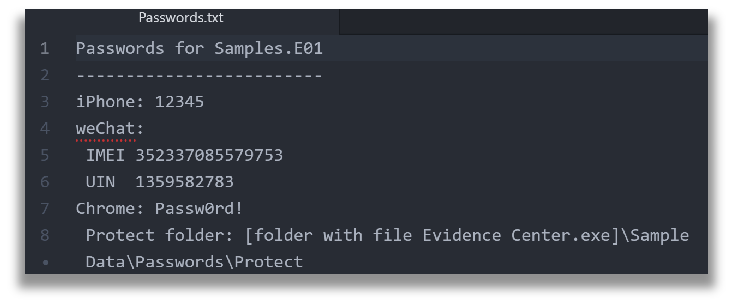
Take note the Passwords folder contains a Passwords.txt file that lists the passwords required to decrypt specific types of data contained within the ‘Samples.E01’ image.
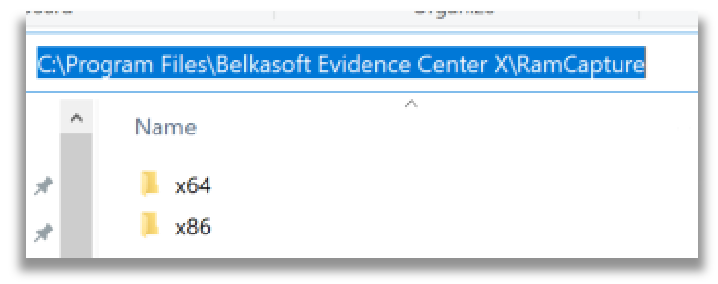
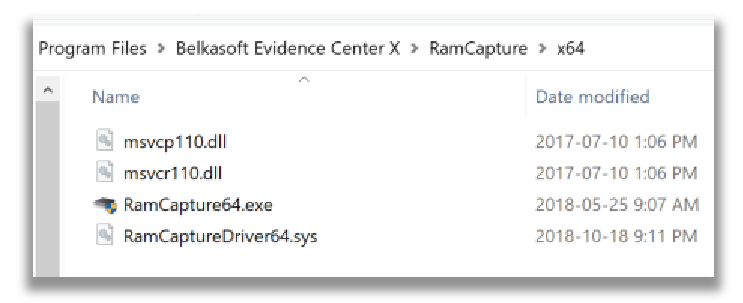
The Belkasoft X installer also installs, in the same application folder path location, the x32 and x64 versions of the Belkasoft RAM Capturer tool, found in their respective folders. These sub-folders are located at: ‘C:\Program Files\Belkasoft Evidence Center X\RamCapture\’. The x32 and x64 folders can be copied on to a removable USB drive for use in the field for acquiring Windows RAM memory.
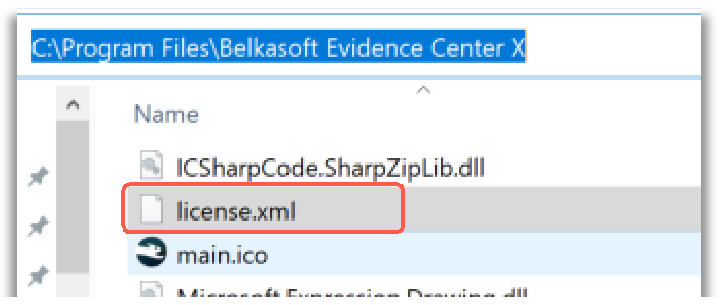
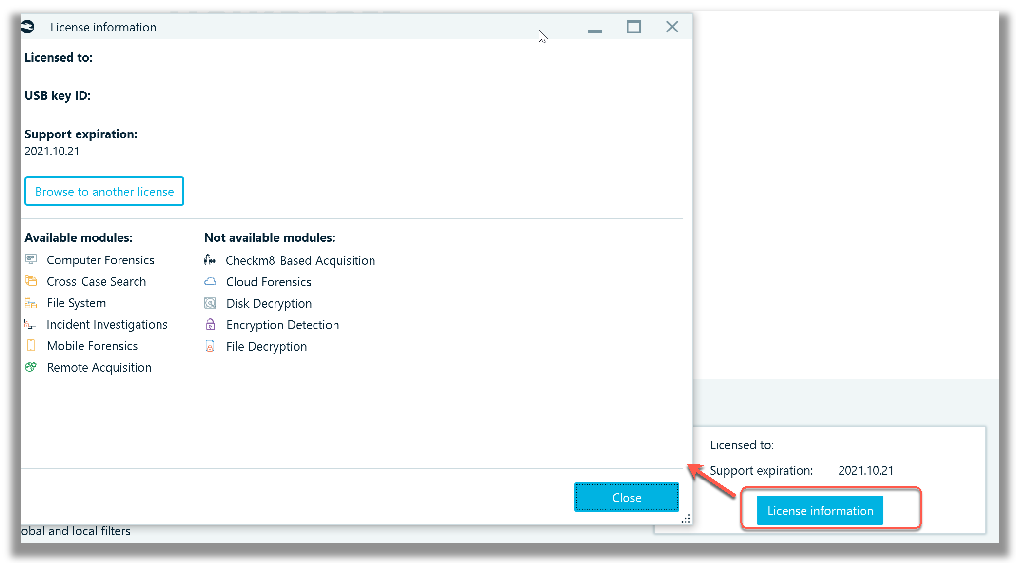
Post install of Belkasoft X, you can drop the ‘licence.xml’ file, into the ‘C:\Program Files\Belkasoft Evidence Center X’ path, which effectively licences the product. The specific licence.xml shown in the screenshot below, is uniquely tied to the USB dongle ID being used.
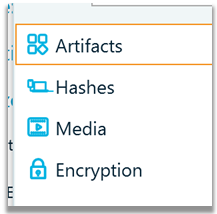
With the licenced USB dongle attached, Belkasoft X can be launched, using the shortcut. Upon starting it, all modules are listed, but only modules covered by the licence are enabled, according to the Belkasoft X edition licence that was purchased.
Before you start processing any data in Belkasoft X, take a few minutes to check the settings. In Settings -> General, specify the application folder path and temp folder path. In the screenshot below the default path locations and settings are shown. When you change the application folder path, you are warned that the program must be restarted to apply the change. Until restarting, the program still uses the old application path and will show the old path when you reopen the Settings window. But after you restart the program, it will use the new application folder and will show the new path in Settings.
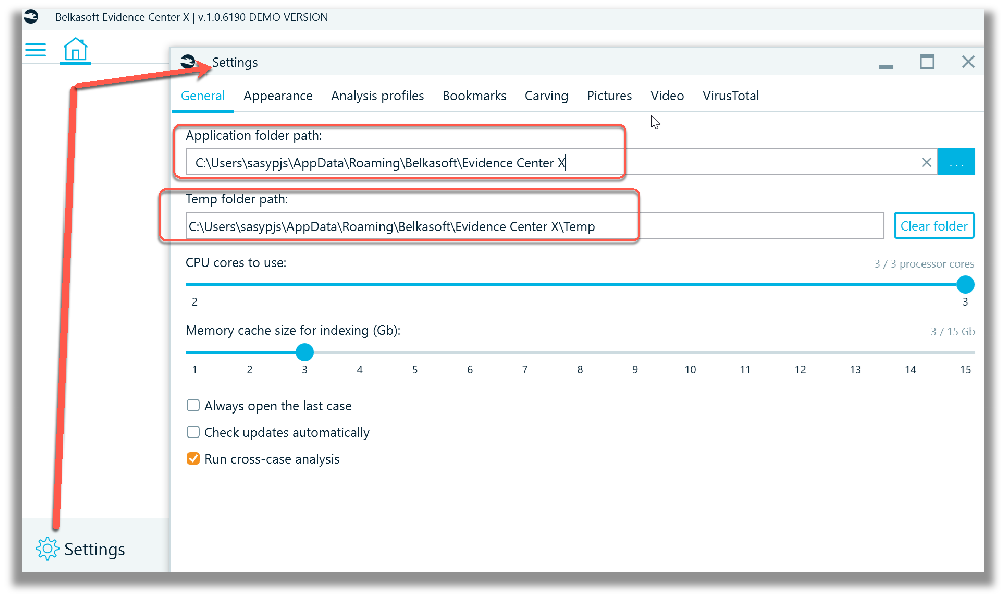
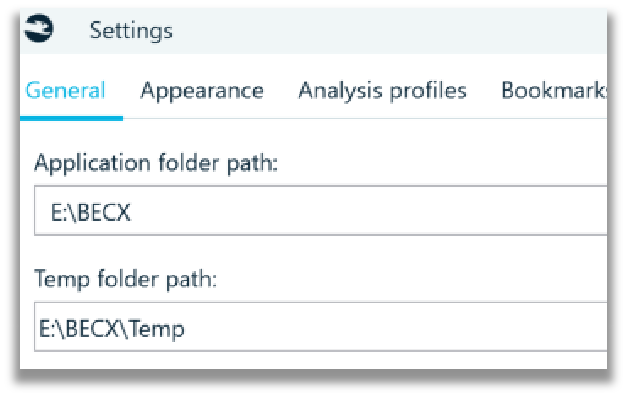
If your system drive is low on space or you want to conserve disk space, then point the ‘Application folder path’ location to a different physical drive. Doing this will automatically change the ‘Temp folder path’ location to the same parent folder of the application folder path.
It is also worth briefly examining the other tabs to personalize other features of Belkasoft X and to gain familiarity with Bookmarks, Carving, Pictures and Video tabs.
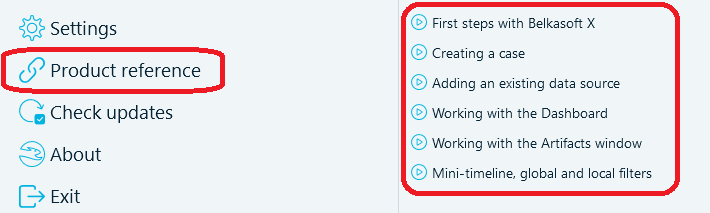
For a detailed user guide, access the product reference and video tutorial links from the home (main) interface window.
Now that the install and basic preferences have been reviewed let’s start processing some data.
Samples.E01 Image File
For the first run of Belkasoft X, the provided ‘Samples.E01’ file was imported into a newly created case. Part of the case creation involves identifying the ‘Timezone’.
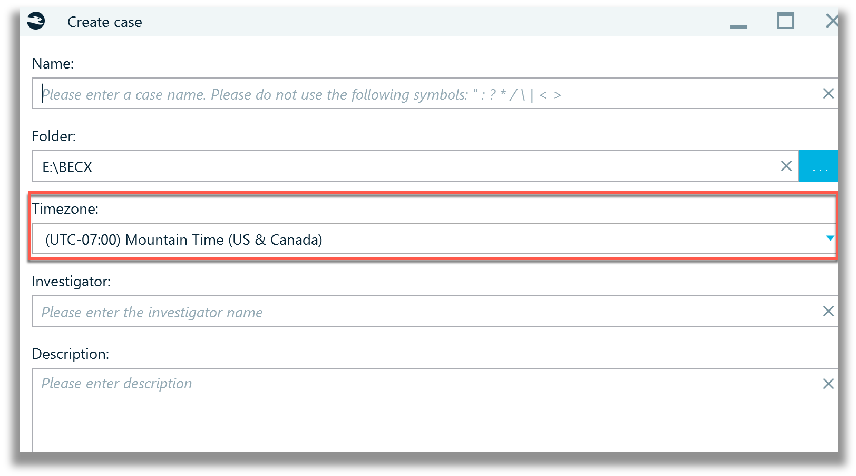
The timezone selection only pertains to data viewed in the timeline portion of Belkasoft X. In all other views in the user interface, the timestamps are displayed in UTC value (Coordinated Universal Time), as observed in my testing. However, Yuri helped clarify that timestamps, in Belkasoft X, are displayed in the format which was used by an app to store it. That is, if an app used UTC, time is shown in UTC, if an app used local time, an artifact would be shown in local time. This is done to show original time value being used by the app of course. The time recalculation, to local examiner’s time zone or device time zone is a handy feature, that is being considered for a future release.
The inability to view data in the time zone local, relative to where the device was primarily being used, can be a challenge, especially when for non-technical persons that will be reading the resulting analysis reports. Most, if not all the digital forensic products that I have used allow an examiner to view the data in the local time zone of the device or that of the examiners.
After you create the case you will need to add a data source to process.
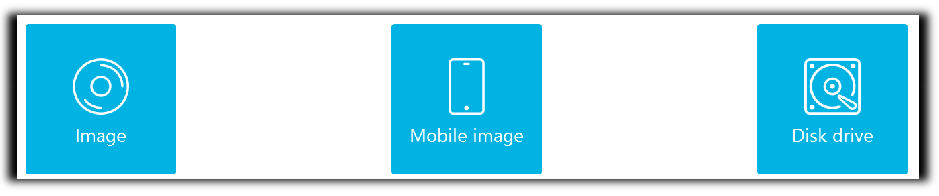
In the ‘Add data source’ window there are three options: Add an existing data, Triage or Acquire.

- Add an existing data source has the following sub-options: Image, Mobile image, Disk drive, Memory dump, Folder.

- Memory dump images supported are: RAM images as ‘.mem’ files, hiberfil.sys and pagefile.sys.
- Triage has the following sub-options: Image, Mobile image, Disk drive. This can be especially useful for quick review of low hanging fruit data.
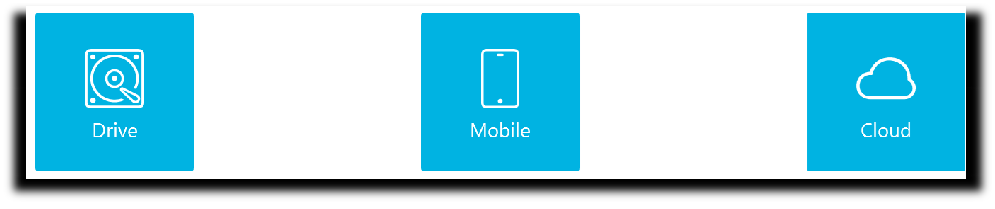
- Acquire has the following sub-options: Drive, Mobile, Cloud.
The next screenshot shows the partitions that are chosen for analysis under the ‘Part’ column’. The ‘Analysis type’ and ‘Carving type’ columns present with default options and can be adjusted according to the needs of the examiner.
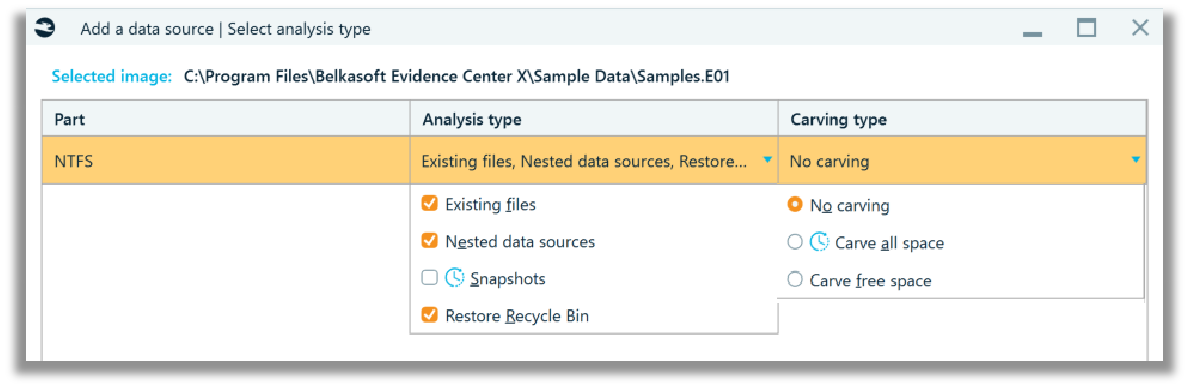
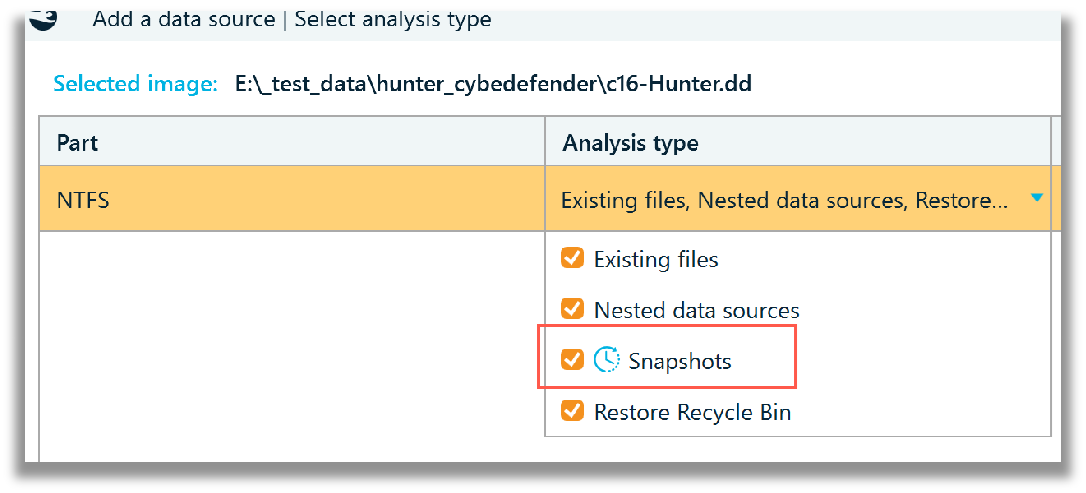
Note that under ‘Analysis type’, the Snapshots (referring to only to Windows Volume Shadow Copies (VSC’s)) is not checked. Therefore, this type of data will not be processed by Belkasoft X. Next to the Snapshots checkbox (which is unchecked in the screenshot), there is a watch/clock icon, when moused over, indicates that selecting this choice will increase processing time. You will also observe this watch/clock icon in media classification and encryption detection areas under the ‘Select advanced analysis options’. This is no different in any other digital forensics analysis product, where refining the volume, in order to parse more data will increase the time taken during processing.

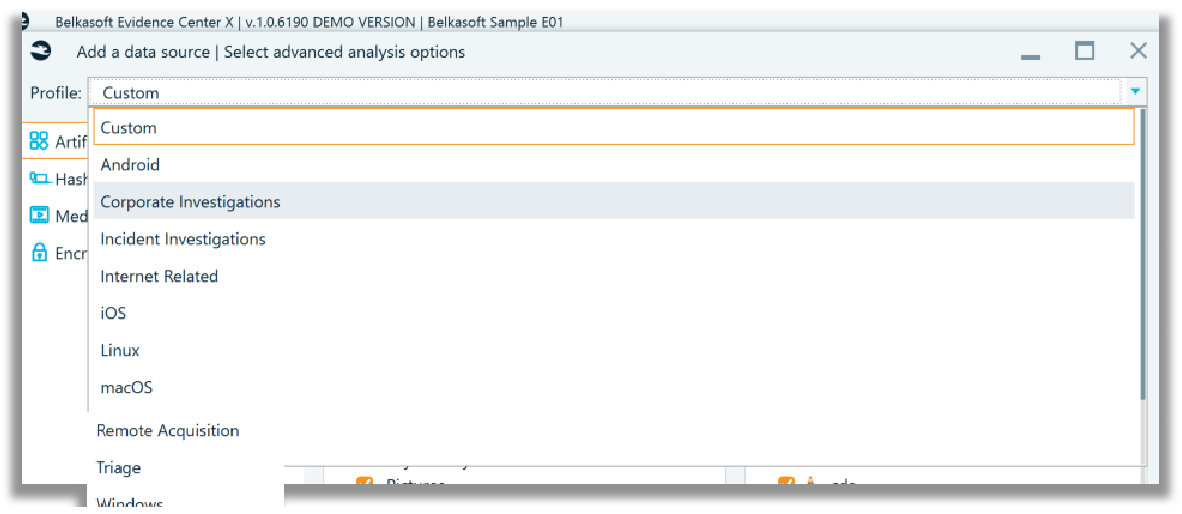
Once the desired analysis options are chosen then click ‘Next’, to advance to the next stage. When you get to the advanced analysis options, you will need to identify the type of profile to use based on the image or data type you are processing.
The chosen profile affects what artifact types, applications and formats are pre-selected for analysis. Regardless of which profile is selected the examiner can elect to modify the profile choices.
For example, a ‘Custom’ profile will select ‘All’ in the ‘Artifact types’ and ‘Applications and formats’ sub windows. Each category of artifact under the ‘Artifact types > All’ has its own subset of artifacts which will populate in the ‘Applications and formats’ area to the right. In the screenshot shown below the Custom profile has been chosen, which has everything selected.
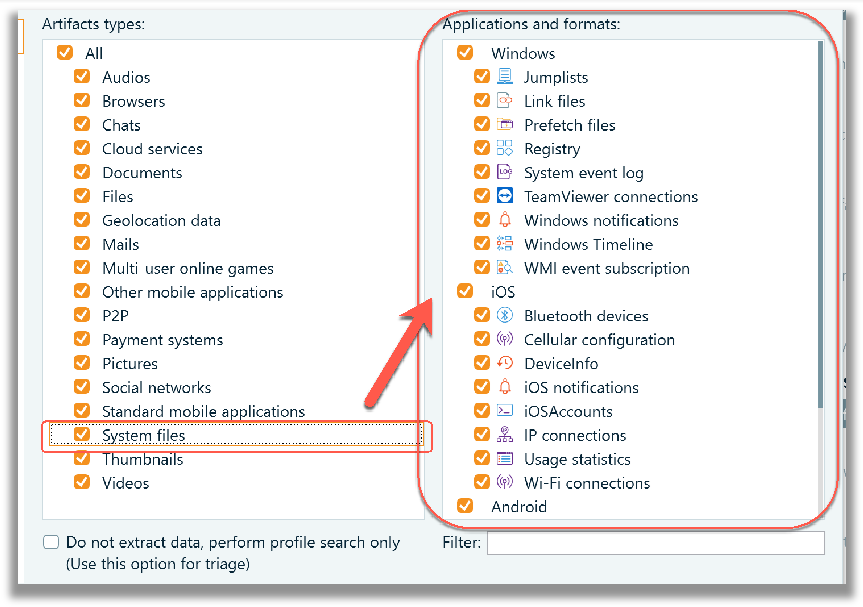
With large datasets it is strongly advisable to try and identify what type of data you are looking to parse and analyze, based on the nature of the investigation and scope of the search. For example, if the data that is being processed contains no Android related artifacts, then deselect any Android options from the application the ‘Applications and formats’ area. In this case, for the ‘Samples.E01’, the ‘Windows’ profile was chosen, and no changes were made to the pre-selected defaults.
After Artifact selection, when you advance by clicking on Next, you are taken to the other areas pertaining to Hashes, Media and Encryption, in order to select any specific options related to these areas. These options are unchecked by default.
Once processing starts, you can see the three default tabs to the right of the home icon: Dashboard, Artifacts and Tasks. The Tasks tab should be periodically monitored in the event that examiner input is required as shown in the screenshot below. In this case the passwords to the iPhone 6 backup and Chrome data are required to be input into the ‘Enter missing data’ area. The passwords are required in order to decrypt the data.
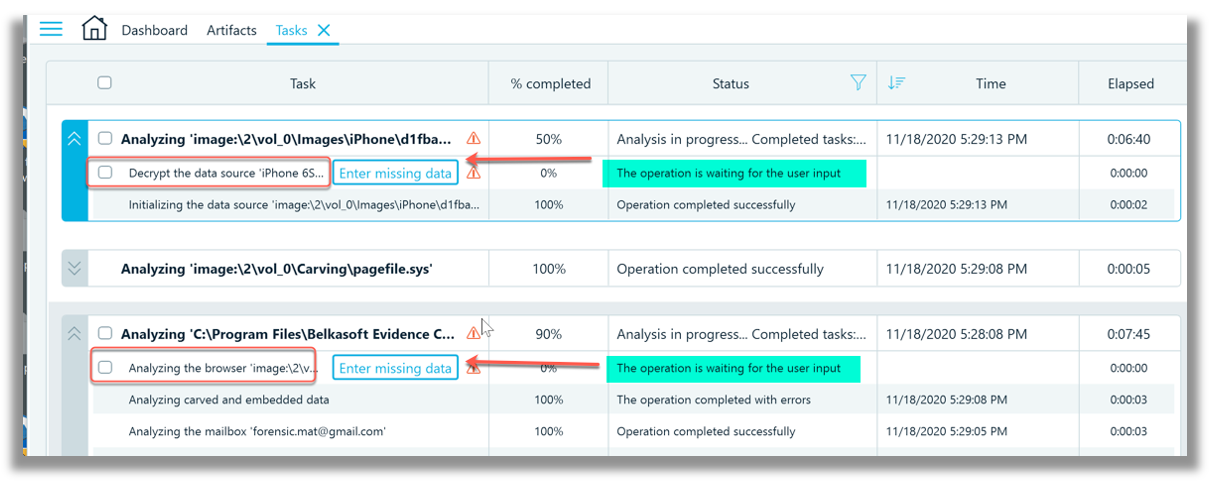
In addition, there is also a nice feature in the Dashboard view, that if there is a pending task waiting for a user input, the corresponding data source on the Dashboard can be identified with an exclamation mark. Thus, Dashboard is helpful for noticing such tasks, too.
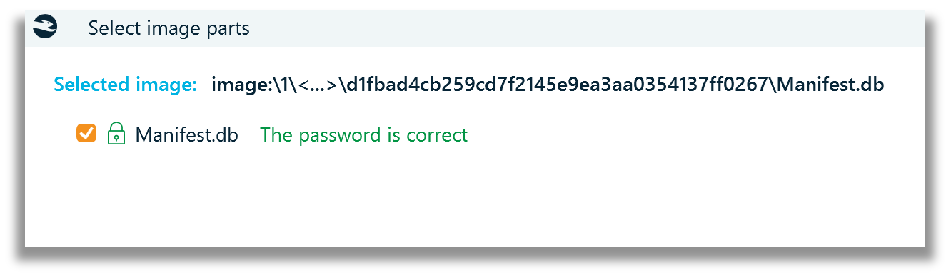
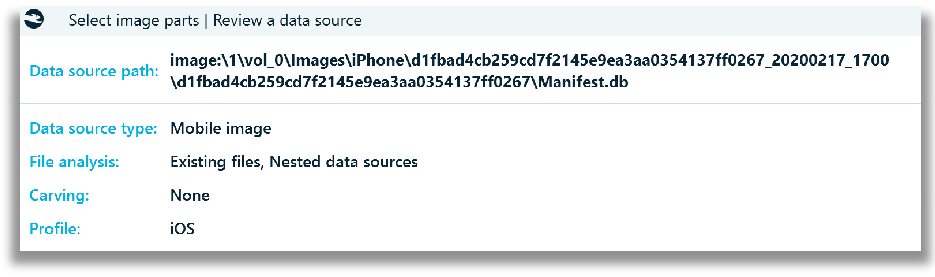
For iOS backup data that is encrypted and identified within a disk image, once the correct password information is entered into the data field, Belkasoft X will prompt you to choose the parsing profile again
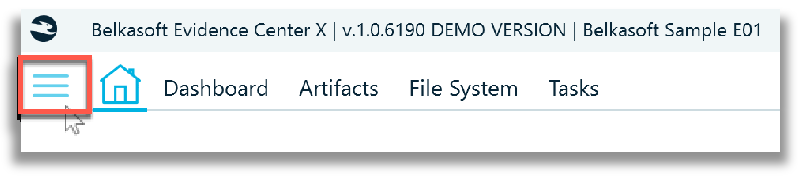
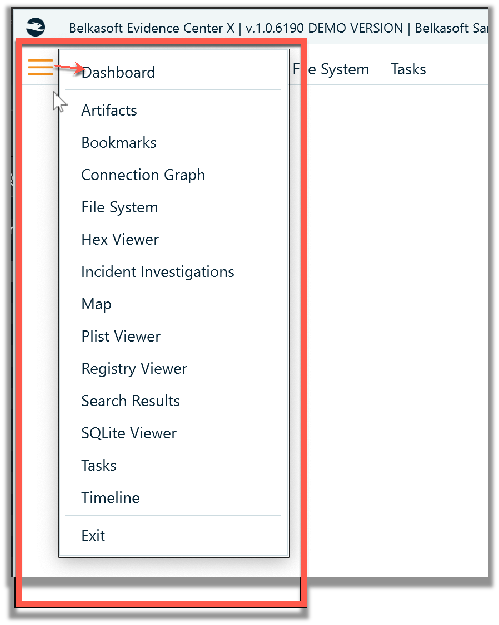
To access more Dashboard tabs, click in the click on the three, vertically stacked, horizontal lines, to the left of the home button.
This will open a Dashboard window where you can enable other tabs for viewing the data.
Once processing is finished, you can review the parsed data from the Dashboard tab, under Data sources. From the Dashboard tab, an overview of all the entire case, from left to right can be viewed: automatic searches, data sources, application types and artifacts.
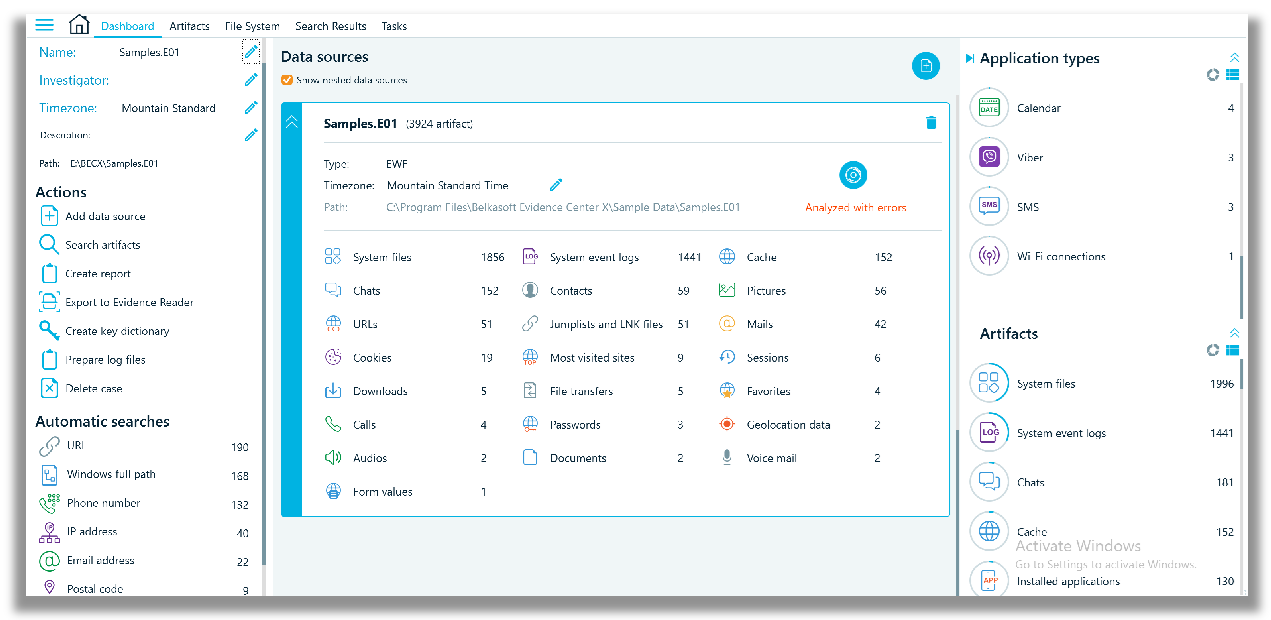
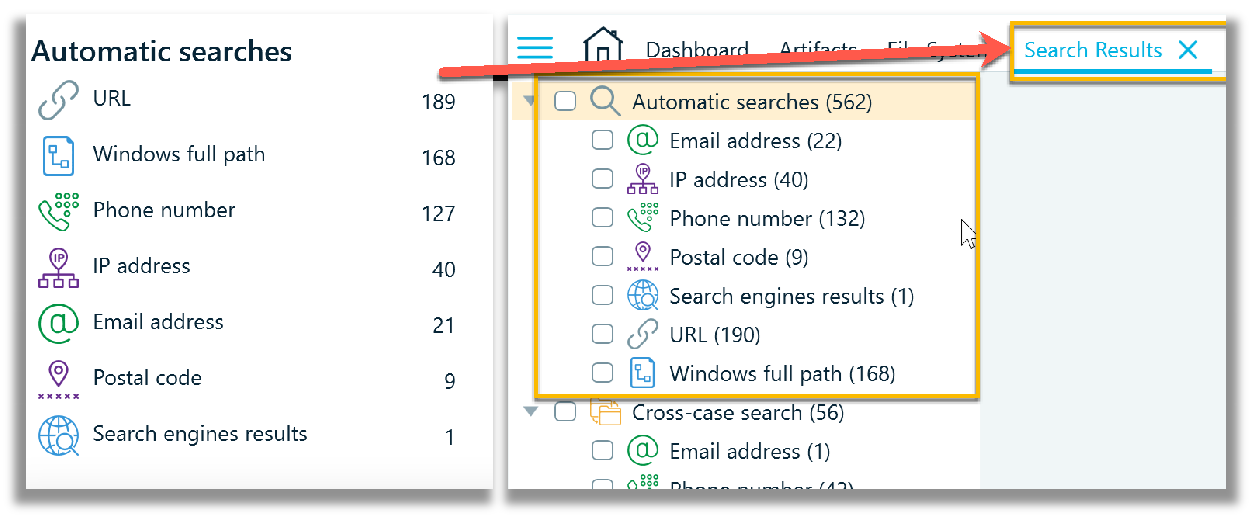
Selecting any category of search under Automatic searches opens a Search Results tab.
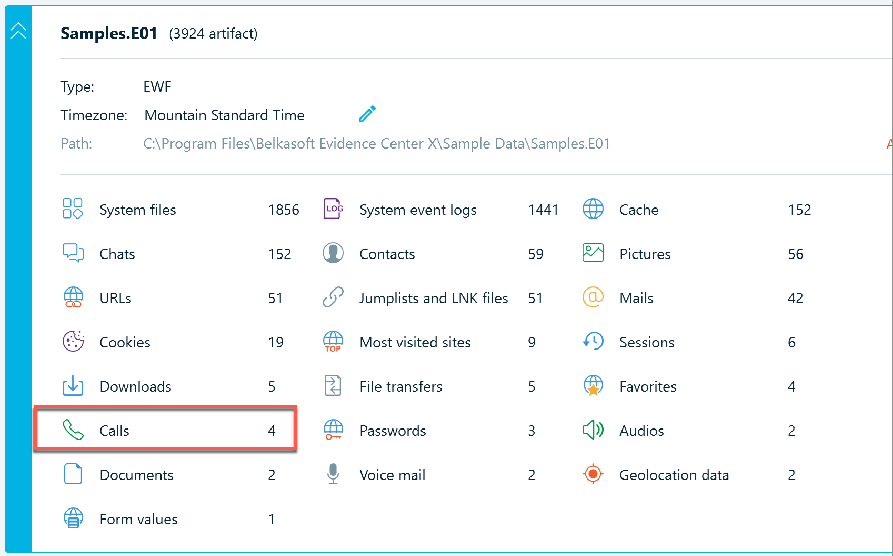
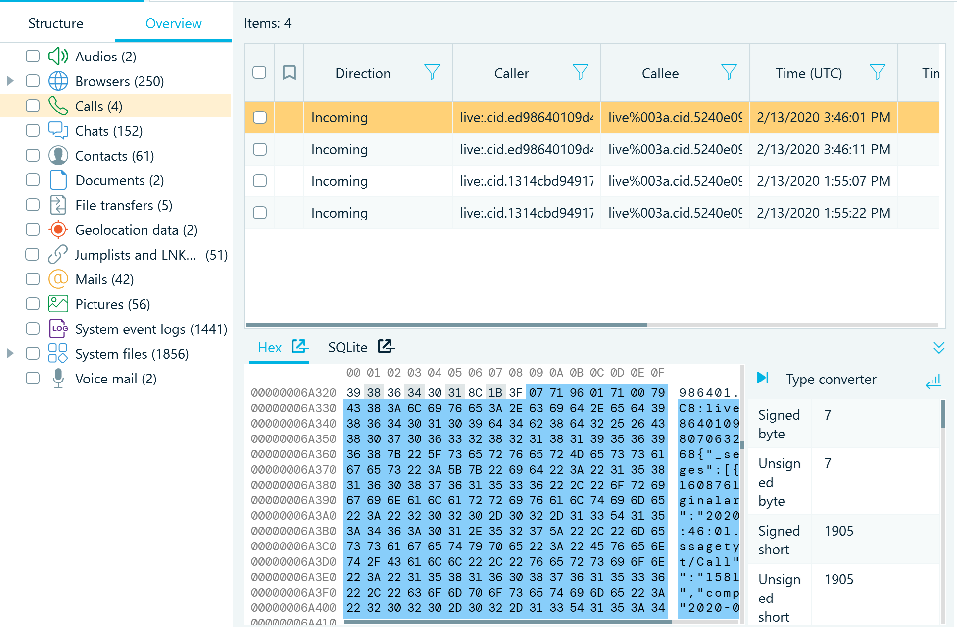
All the categorized data sources, when clicked on, will take you to the corresponding data category in the Artifacts -> Overview tab. The next two screenshots show the Calls data source being accessed.
In the Artifacts -> Overview tab, the Calls data shows four incoming Skype call records in the Items window. The artifact properties are shown on the far right, and for this type of data in the Hex Viewer is also the SQLite viewer are shown below. The Hex Viewer has a data interpreter attached to it.
There is a flat timeline bar at top of the Artifacts tab, that can provide a quick and easy overview of when this specific disk image had user activity. A slider function can be used to filter artifacts (data) for a desired time period. When the slider is used, the amount of artifacts that are displayed to the examiner, are adjusted accordingly based on the time period being viewed.

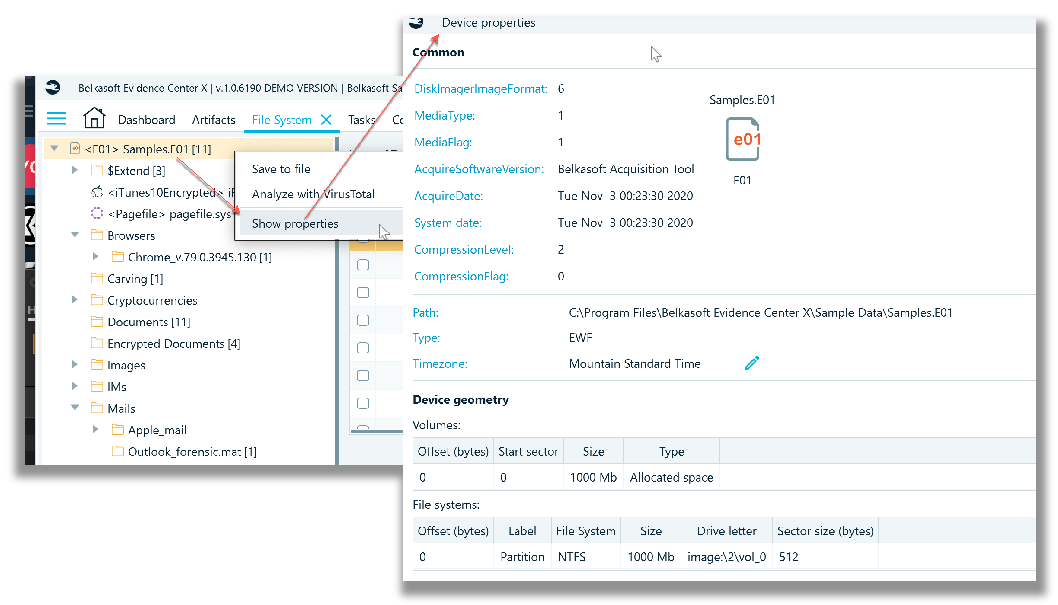
The File System tab allows an examiner to view the entire file system structure of the ‘Samples.E01’ image file. Right click to show the properties of ‘Samples.E01’. This presents the Device properties where information about the image is presented along with the device geometry. The screenshot below also visually shows what type of data has been seeded into the sample image file.
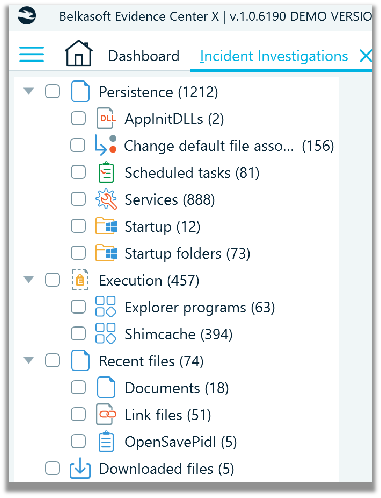
Two other tabs worth reviewing during data analysis, are the Incident Investigations and Connection Graph tabs. I find the Incident Investigations tab contains a nice summary of artifact areas that can be quickly reviewed to discover if there are malicious file based threats, that have gained persistence on a Windows operating system disk.
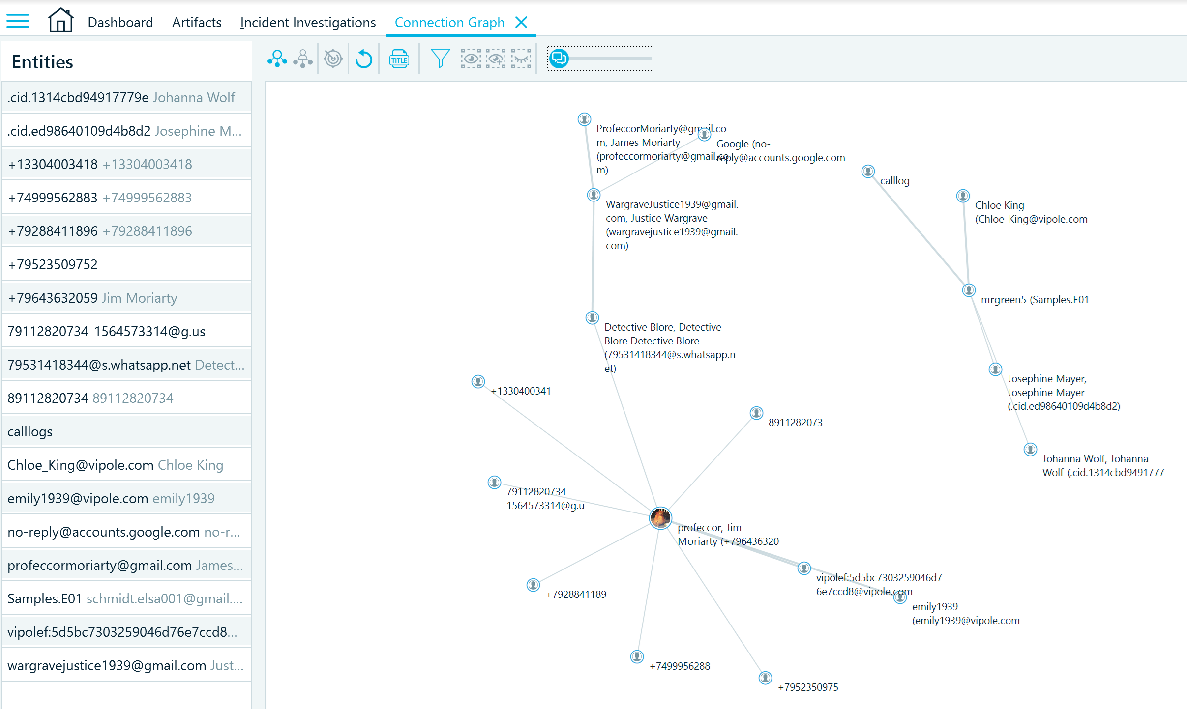
The Connection Graph is an effective way to visualize connections between data artifacts relating to persons relative to SMS messages, call logs, Instant Messenger, file transfer, email etc.
Using Belkasoft’s seeded image file, ‘Samples.E01’, allowed me to understand the layout and flow of the user interface. It has changed, I think, for the better compared to its predecessor. In the next few sections I will be using various CTF image files and Josh Hickman’s iOS 13.4.1 public image.
Horcrux Image File
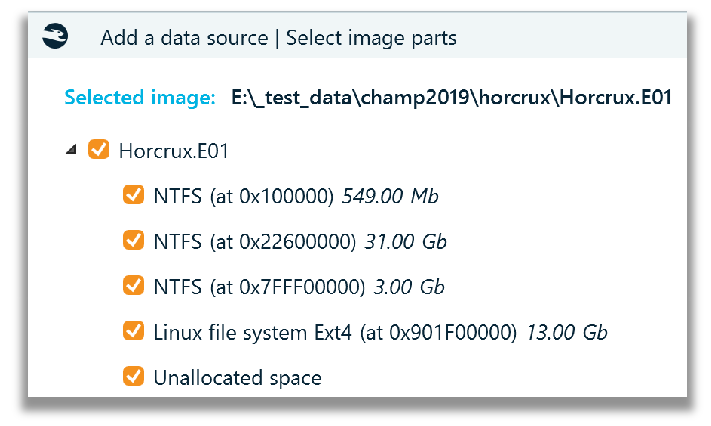
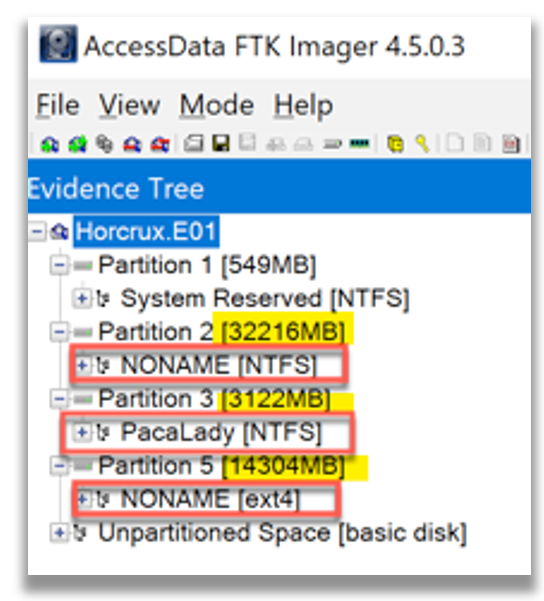
This image file created was by Champlain College’s Digital Forensic Association for the 2019 Unofficial Defcon DFIR CTF. After creating the case the data source was added in the manner of the Horcrux.E01 file. In Belkasoft X, by default, all the partitions/volumes within the disk image are checked. Remember what I said earlier about targeting the areas you want to process? Well, this also applies to partitions/volumes within the disk image as well. The challenge here is I don’t know exactly which partitions should be selected for processing. There are no volume names (default or otherwise) to identify a ‘System Reserved’ partition from the user operating system partition. Based on my experience, I can take an educated guess based on size of the volume and ascertain what I likely don’t need to process now.
However, I leveraged another tool, FTK Imager 4.5.0.3, to assist me in verifying my educated guess. I guessed correctly for the NONAME NTFS partition (user operating system) and NONAME ext4 (Linux) partition. I have never seen a volume named ‘PacaLady’ and will include this also. In my experience, all the digital forensics analysis tools that I have used have the ability to allow me to view the volume name and quickly peruse the file system to some degree and select folder and files that are contained within the partition before I elect to process any data within their respective volumes. This is extremely useful in using a targeted sniper digital forensics approach, especially in cases where the data sizes are large.
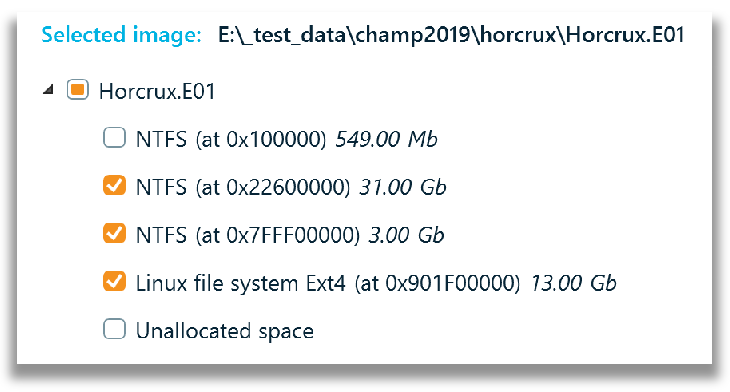
Based on the previous screenshot and explanation, two areas of the disk image have been excluded as shown below. For analysis type I selected to include Snapshots for the 31.GB NTFS volume and used the default settings for the chosen volumes with no carving.
A ‘Custom’ profile was selected due to the presence of two operating systems in this image file. Under Artifact types, I manually went through each artifact type and deselected either Android or iOS and selected Linux where support was provided. Specifically, for System files, there is no parsing for Linux system data, like there is for Windows, MacOS and iOS. Also trying to type Linux in the filter field does not, unfortunately identify every Linux artifact, as the filter only accepts artifact names, not OS names. The examiner must manually review each Artifact type area.
If I wanted to verify the hash value of the forensic image file, I am not able to do this in Belkasoft X, nor could I find any reference to this in their user guide. Belkasoft X had no issues, that I observed parsing this image file.
With the caveat in mind, that I have not used EnCase or Access Data’s Forensic Toolkit (FTK) in years, Linux based artifacts presented in nicely laid out categories, like what is done for Windows, macOS, iOS and Android are a challenge for the digital forensic tools. In the next section Snapshots (Volume Shadow Copies)will be briefly explored.
Volume Shadow Copy (VSC)
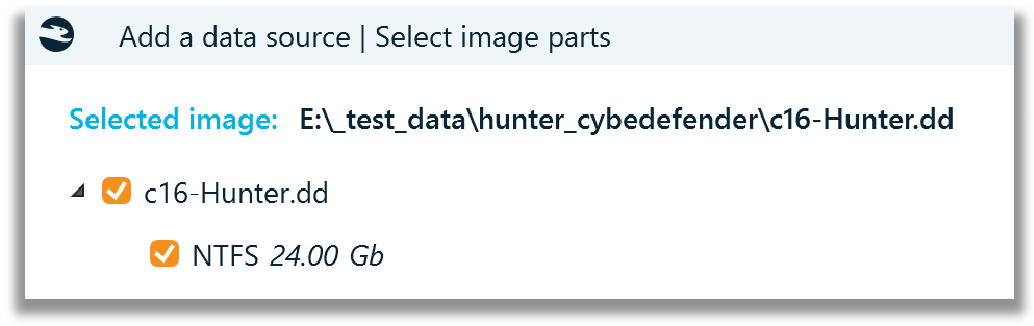
The Hunter ‘dd’ image file was used for this test as I already know that it contains two Volume Shadow Copies (VSC’s), from my testing with Arsenal Image Mounter (AIM). Belkasoft X shows with one partition (volume) structure. The Windows profile was selected for parsing the artifacts.
In the analysis type, I selected the ‘Snapshots’ and nothing for carving.
From the File System tab, the two Volume Shadow Copies (VSC’s), that Belkasoft X calls Snapshot, can be observed, reconstructed as an actual file system. This is an excellent feature, which can allow an examiner to potentially go back in time and examine any user or system data that may not exist in the current version of the file system.
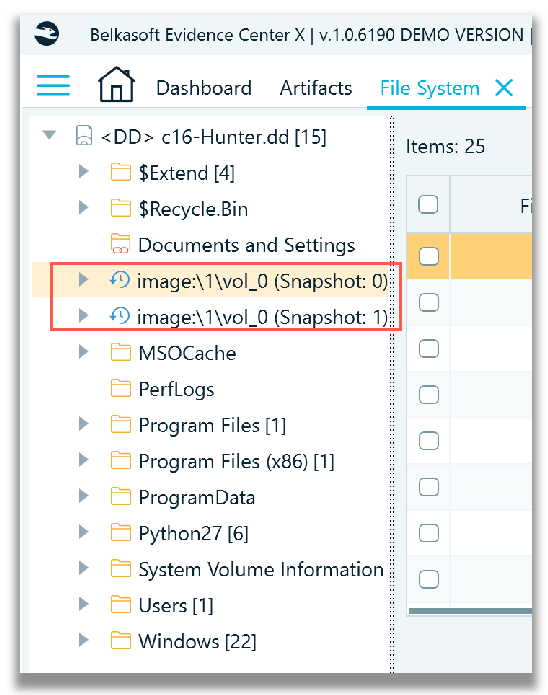
The next screenshot shows Snapshot 0 and Snapshot 1, with the file system tree expanded to show the directory structure.

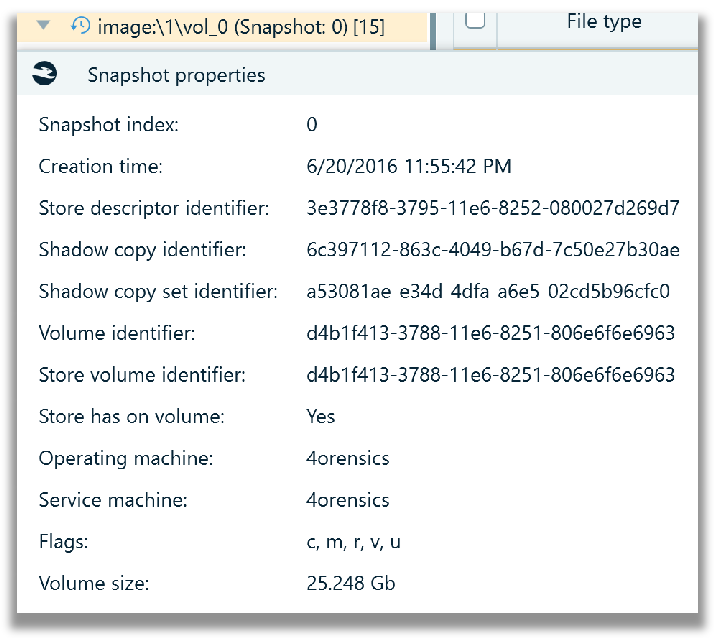
In the File system tab, the properties of the VSC image can be viewed by right clicking and selecting ‘Show properties’. The creation time of the of the VSC, in Belkasoft X is displayed in the timezone that is chosen during case creation. In this case, the time is displayed in UTC -07:00 Mountain Time.
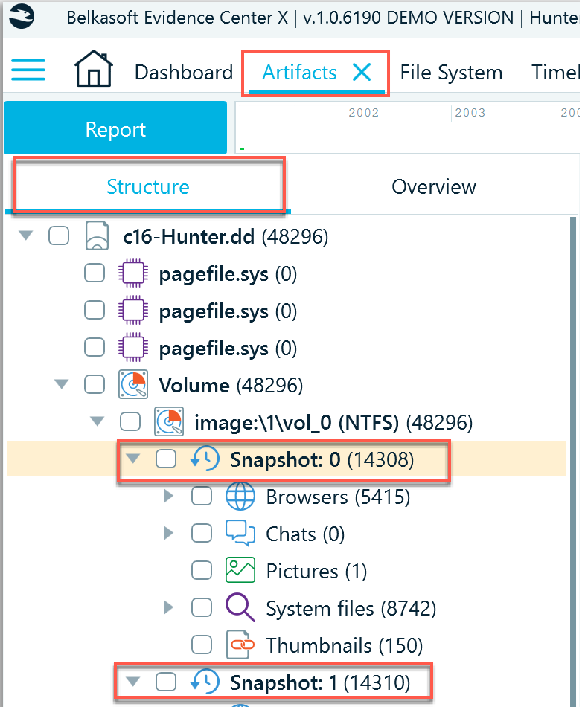
The types of data parsed from VSC’s represented in Belkasoft X, as artifact categories can be viewed from the Artifacts tab -> Structure tab, as shown in the screenshot below.
Hopefully this brief review of Volume Shadow Copies has provided some useful insight as to how Belkasoft X manages this type of artifact.
Windows Memory – Lone Wolf Scenario
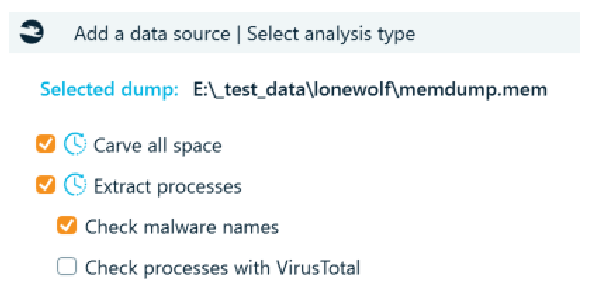
To see how Belkasoft X handles Windows memory parsing, the Lone Wolf scenario CTF Windows memory image was added to a newly created case using the Windows profile for processing. The options shown in the following screenshot, are all unchecked by default, but the first three options were checked for processing of the ‘memdump.mem’ file.
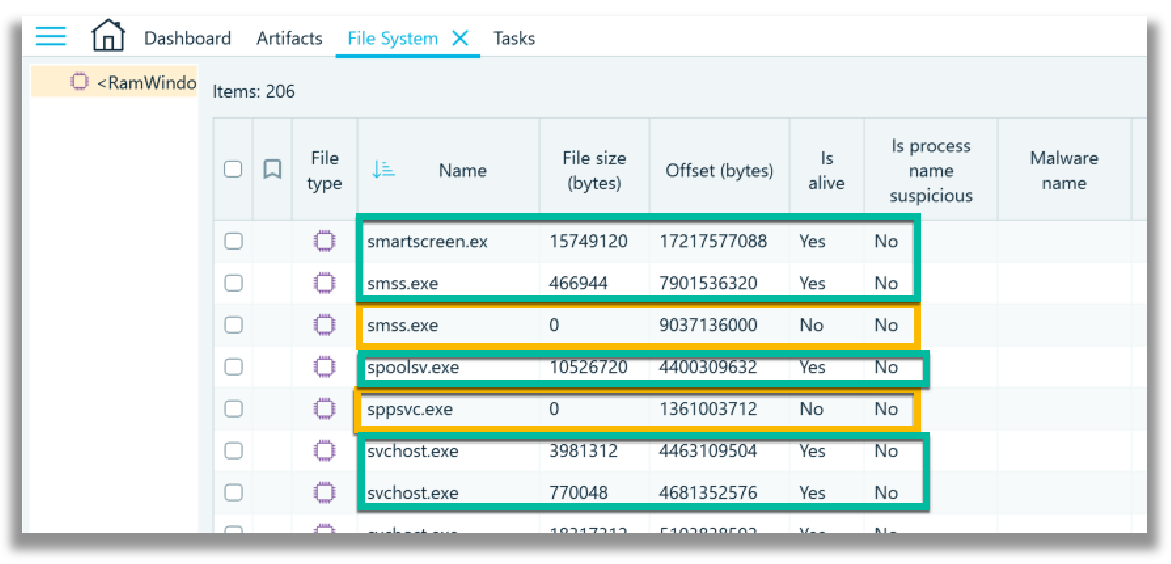
In the File System tab, a list of the processes within the ‘memdump.mem’ file is identified. The processes that are not ‘alive’ and have a file size of 0 (zero) bytes, are terminated processes and thus these executables cannot be extracted, compared to those processes that are classified as ‘alive’.
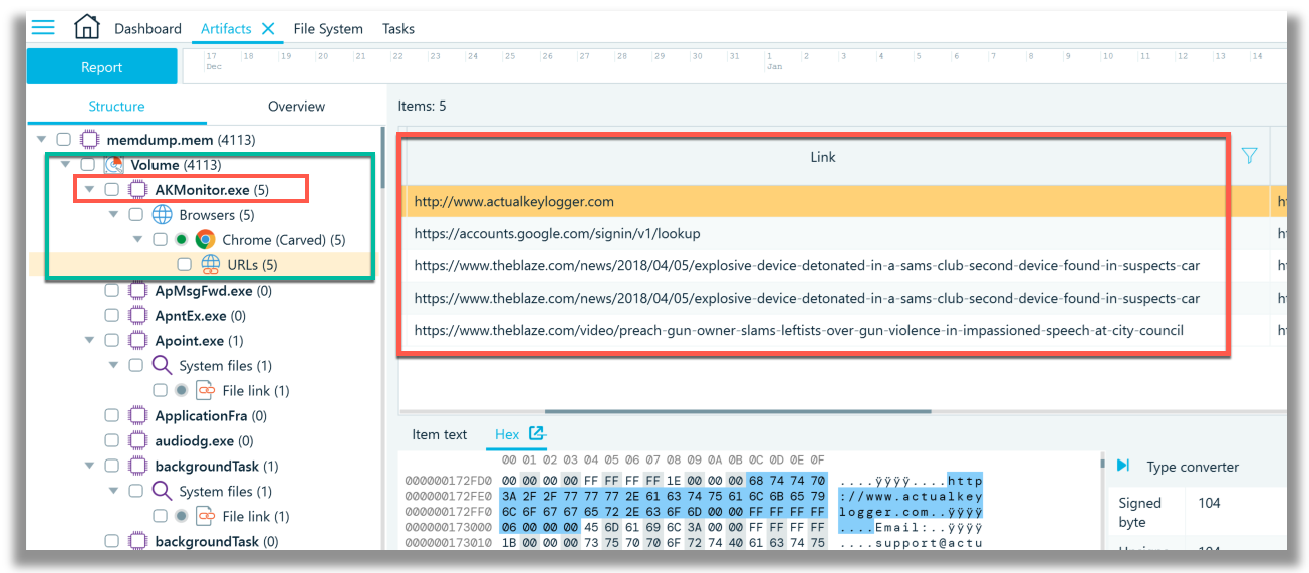
The Artifacts -> Structure tab list all processes in alphabetical order detected by Belkasoft X within ‘memdump.mem’ file. I have not read the Lone Wolf scenario specifics, and my remarks/observations to follow, are prefaced based on the fact that I have no understanding of the investigation. The first process, listed alphabetically, that I chose to examine, led me down a rabbit hole. Looking at screenshot below, I paid specific attention to the ‘AKMonitor.exe’ process which contains 5 (five) Google Chrome web browser URL records. The first record shows a URL link to a keylogger website, with the last three records referencing explosives and gun violence. These carved records could likely be of importance in the Lone Wolf scenario digital forensics investigation. I like that within child process, ‘Chrome.exe’ (of the parent process AKMonitor.exe), Google Chrome web history URL records were carved and listed.
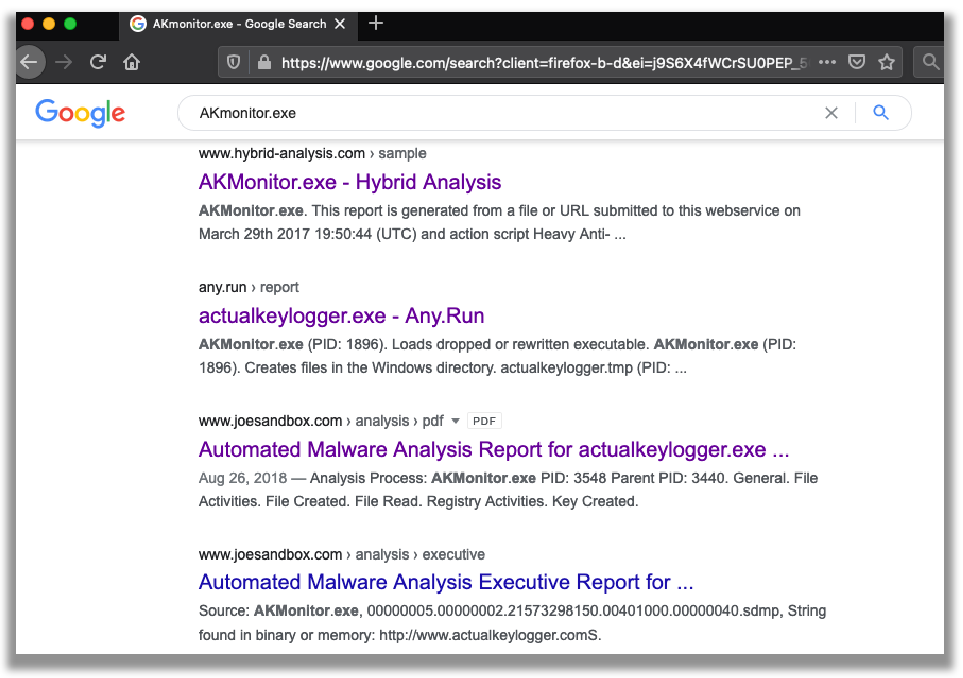
I decided to do a quick a Google search for ‘AKMonitor.exe’ and learned, that at the very least, there are several references to this specific process being a component of the ‘actualkeylogger.exe’. The Google search is shown the next screenshot.
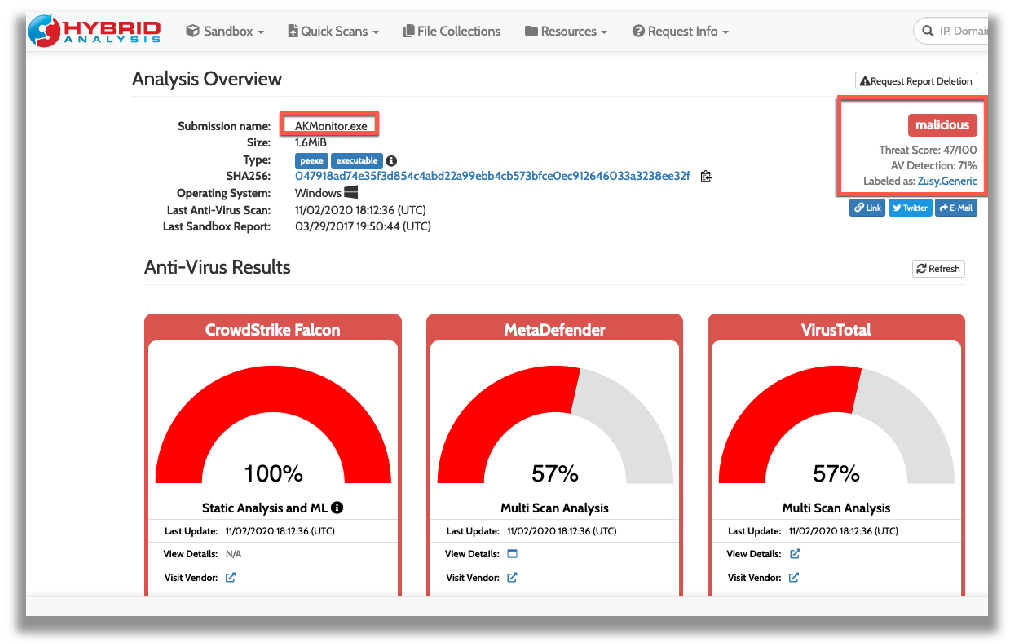
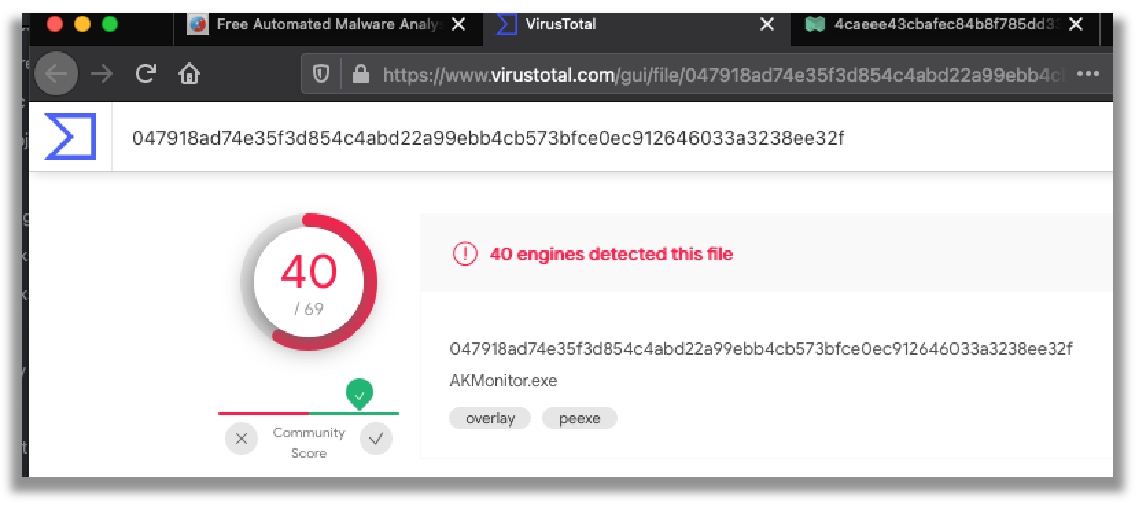
From the results of the Google search, I then checked the Hybrid Analysis search hit link, as shown the next two screenshots below. This led to the discovery that not all anti-virus engines detect ‘AKMonitor.exe’ file, even though this file has historical information of being checked within a sandbox in late March 2017.
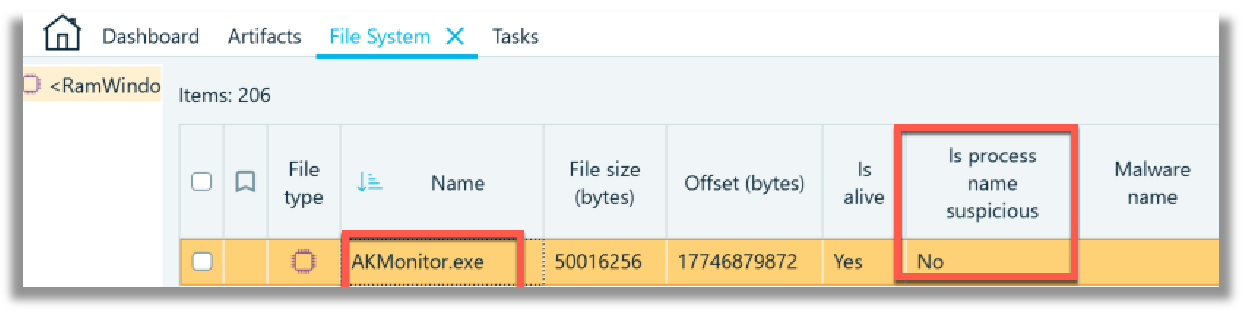
Going back to the File System tab, I checked the ‘AKMonitor.exe’ process and see disconcertingly that this process has not been classified as suspicious by Belkasoft X. What I also do not see identified in any tab or view about the extracted processes is the PID (Parent ID), the PPID (Parent Process ID), the Windows user account that the process was spawned from or the process create time. However, Yuri clarified the following: “This kind of analysis is based on fake system process names only. Say it, if there is an scvhost.exe instead of svchost.exe, or winlogen instead of winlogon, this will be detected. To analyze processes with more advanced methods, one can select Analyze with VirusTotal option.”
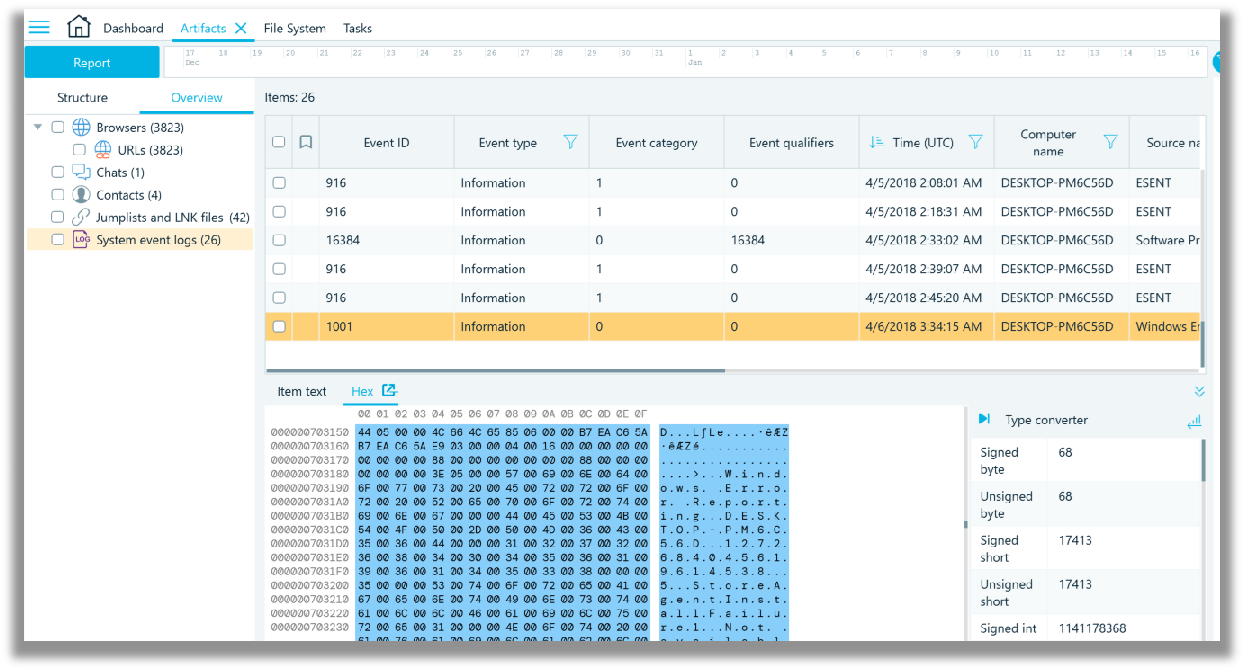
The Artifacts -> Overview tab will show artifacts by their respective artifact category. In the screenshot below, Windows system event logs have been carved from the ‘memdump.mem’ file. Unfortunately, the processes that are listed alphabetically in the Artifacts -> Structure tab are not presented in the Artifacts -> Overview tab, where they could be further scrutinized in a Hex viewer by an examiner.
Instead, go in to the File System and select corresponding data source (memory dump), all processes will be shown on the grid, which shows files for regular images. On the bottom, there is a Hex Viewer, showing you the selected process raw memory.
For memory analysis, my personal preferences are the free open source tools: Volatility ( Volatility GitHub,) Volatility Workbench (by Passmark Software) and MemProcFS.
Apple iOS 13.4.1
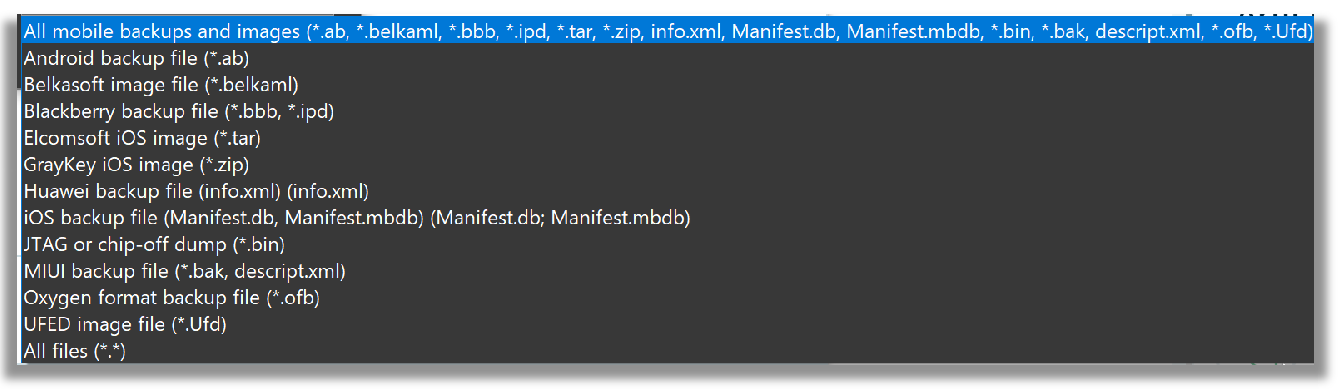
For mobile data testing, I elected to use publicly available iOS 13.4.1 full file system data provided by Josh Hickman (a/k/a The Binary Hick). When adding the data source, the following types of mobile data is accepted for ingestion into Belkasoft X, as shown in the screenshot below.
The defaults were left checked for parsing, using the iOS profile.

I was pleased to see device pattern of life artifacts being identified in two primary ways:
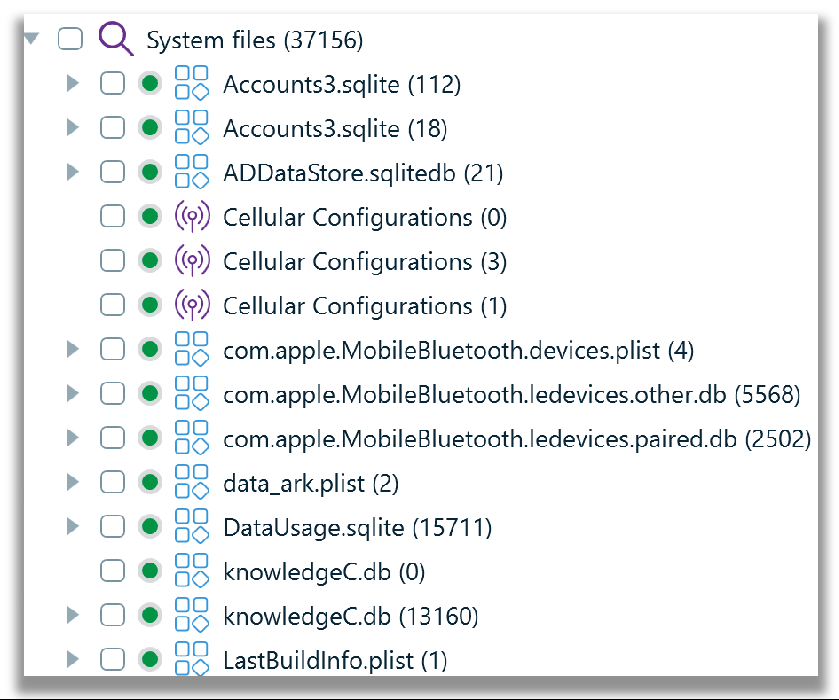
1. File Type: Artifacts tab -> Structure tab under System files, broken down by file that contains the pattern of life data as shown in the screenshot below.
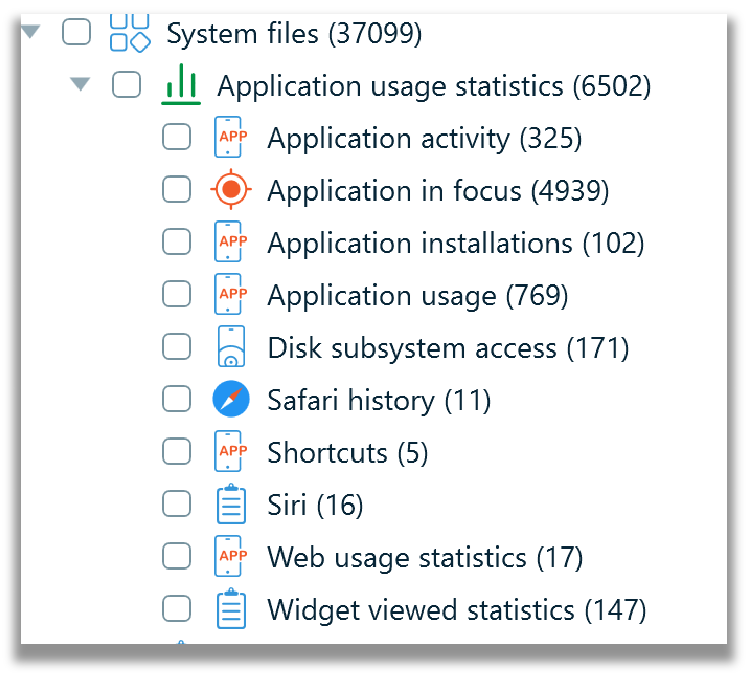
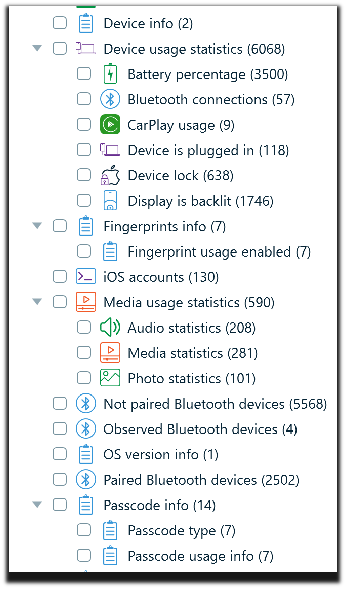
2. Activity type: Artifacts tab -> Overview tab under System files, broken down by a pattern of life data activity type, as shown in the following two screenshots.
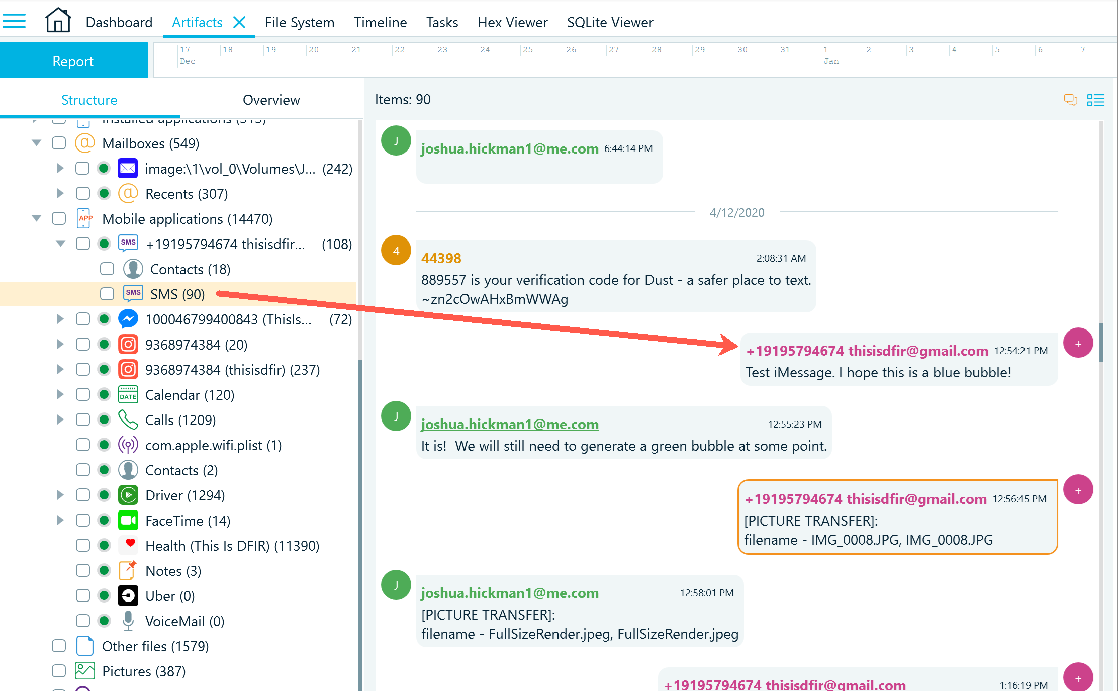
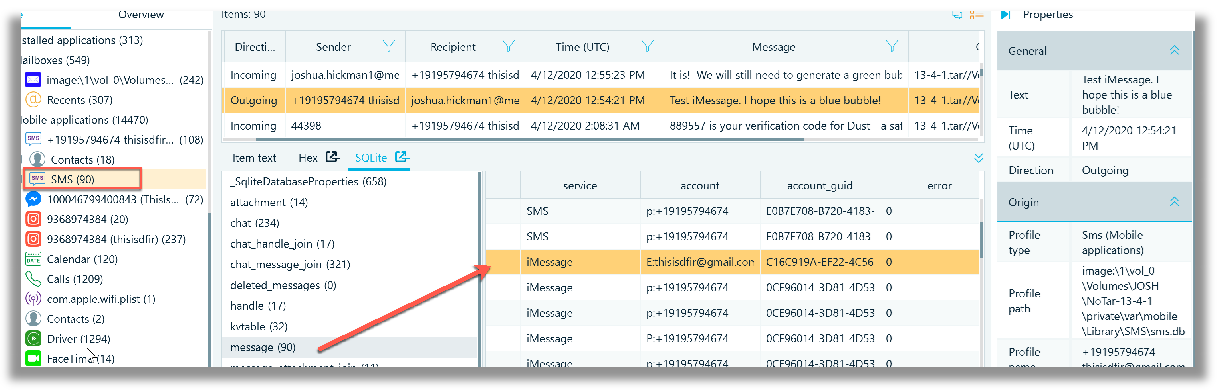
I did note that messages, regardless of native application or third party (non-stock) applications, can also be viewed as bubble message format, in addition to the traditional grid view. In the screenshot below, the ‘SMS’ (under Mobile Applications category) is the native iOS Messages app, that shows a message referencing the word ‘iMessage’. The message bubbles relative to SMS and iMessage messages are not delineated using the green and blue bubble colour scheme respectively, that is so commonly recognized by most if not all smartphone users. The current visual view makes it hard to distinguish which message was sent from the device through SMS versus iMessage.
In the next screenshot, the grid view and the SQLite viewer, show the same message, from the previous bubble message screenshot. The SQLite viewer shows the sms.db file, messages table, where the service column clearly identifies that the message was sent using the iMessage service. However, in the grid view (above the SQLite viewer) there is no column that provides a distinction between SMS and iMessage, nor is this distinction provided in the message properties window.
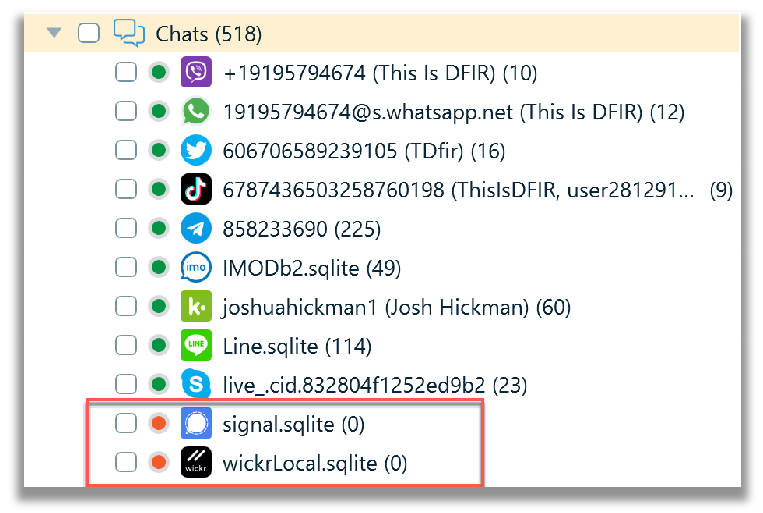
Third party chat (non-stock), instant messaging applications are listed under the Chats category relative to the Artifacts -> Structure tabs. In the screenshot below, data from two specific messaging applications, Signal and Wickr were not parsed. For reasons unknown to me, Belkasoft X had difficulty in rendering the Signal and Wickr SQLite databases, within the File System view. As awareness to the reader, Signal and Wickr are very well encrypted, and the keychain is required in order to decrypt these databases. I did not check, in this case for the presence of a keychain file. Generally, Belkasoft X can process the keychain file only if a full file system (FFS) image of the iOS device is extracted by Belkasoft X (checkm8, agent, jailbroken device), because there is no standard format for storing keychain extracted with FFS.
Even though no screenshot examples are provided, I also quickly checked ‘.plist’ and ‘.bplist’ files which appear to be displayed correctly. What I could not understand how to do in Belkasoft X is recursively view all files and then filter all files, based on extension, for plist, bplist or sqlite (database) file types. In other words, there is no category, which I can see, that allows an examiner to quickly filter and identify these types of files by their detected file signature or extension.
Within the Belkasoft X product (and further explained in the user guide), the search function, as cited directly from the help guide, is restricted to indexed data that is: “text-based properties of artifacts, such as their texts, dates and times, metadata and some other things”. An examiner cannot live (raw) search all the files/folders or selected files/folders. Indexed data may be quicker to search. In my experience, I have found, regardless of analysis product being used, where an indexed search has failed to identify the search value of interest, and hence, I resort to a live (raw search), of selected files (rather than the entire image) as my preferred method of searching. Of course, there is the ability to do raw search inside an entire data source in Hex and search for a string or a hex pattern.
I did briefly check the parsing of an macOS Catalina APFS image file using the macOS profile. In my opinion at this time, I believe that other commercial products perform better, based on previous usage.
Final Thoughts
Remember that there are other data source options, including Triage, that were not explored in this article, nor was the extraction/acquisition of data investigated using Belkasoft X. I invite the interested digital forensics practitioner to try Belkasoft X for themselves using any of the publicly available data sources.
The needs of a digital forensics’ lab and along with financial factors, can greatly influence which commercial products are purchased. In my opinion, based on my general review, I would consider Belkasoft X for parsing Windows data, iOS and Android mobile data.
I hope this review has been useful, and a good high level overview, regarding the capabilities of Belkasoft X. Thank you for taking the time to read this.
Sources
1. Horcrux Image File created by Champlain College’s Digital Forensic Association for the 2019 Unofficial Defcon DFIR CTF: https://drive.google.com/drive/folders/1JwK8duNnrh12fo9J_02oQCz8HlILKAdW?usp=sharing
2. Hunter DF Image File (must sign in to download): https://cyberdefenders.org/labs/32
3. Lone Wolf Scenario Memory Image: https://digitalcorpora.org/corpora/scenarios/2018-lone-wolf-scenario
4. Josh Hickman’s iOS 13.4.1 Public Image: https://thebinaryhick.blog/?s=13.4.1
5. Josh Hickman’s Android 10 Public Image: https://thebinaryhick.blog/2020/02/15/android-10-image-now-available/
6. Josh Hickman’s Android 11 Public Image: https://thebinaryhick.blog/2020/10/07/new-android-image-available-this-one-goes-to-11/
7. Champlain College’s Digital Forensic Association CTF Spring 2020 MacOSImage:
https://drive.google.com/drive/folders/10VsFFlTyiZyPnjCKaBmUhdsRiT4XrcIC?usp=sharing
https://champdfa-ccsc-sp20.ctfd.io/

